Race Day Operations Guide
This guide covers the full race day workflow: checking in racers, scheduling heats, running the race, and viewing final standings.
Note
Prerequisite: Your roster should already be set up before race day. See the Race Setup Guide if you still need to add racers or configure dens.
Race Day Overview
On race day, two operators typically work side by side:
| Role | Primary Page | What They Do |
|---|---|---|
| Check-In Operator | Roster | Verifies cars passed inspection, records car weight, adds photos |
| Race Control Operator | Race Control | Schedules heats, starts heats, records results |
| Audience / Spectators | Observation | View live standings and currently-racing heats |
The check-in and race control functions can be handled by the same person for smaller events, or split across two devices for larger packs.
Part 1: Check-In
Opening the Check-In View
Check-in happens on the Roster page — the same page used to manage the roster before the event. On race day, you work through the racer list and mark each car as inspected before it races.
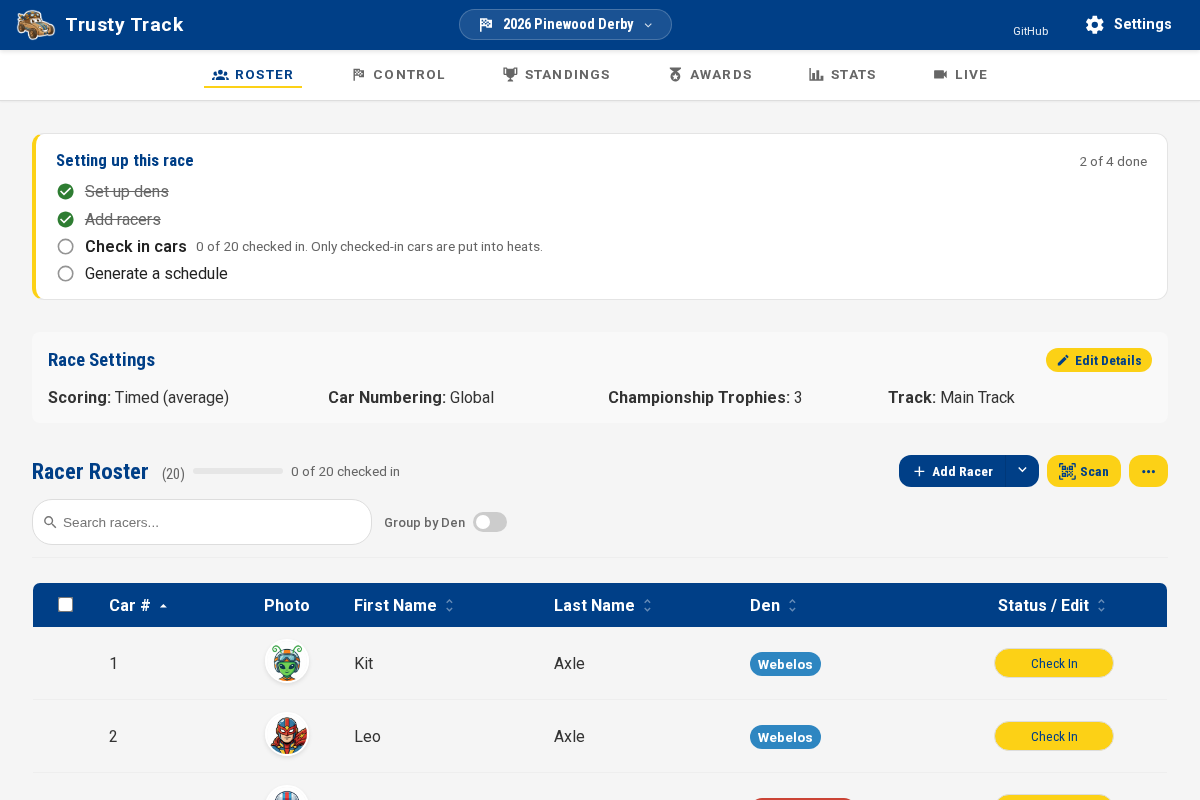 The Roster page at the start of race day. Every racer has a gold Check In button in the Status column; it turns green and reads Checked In / Edit once they are through.
Checking In a Racer
- Find the racer in the list. Scroll, or use the search box above the roster — it matches on name, car number, and den.
- Click the Check In button at the end of their row to open the check-in form.
- Toggle Passed Inspection / Checked In to mark the car as cleared to race.
- Optionally enter or update the Car Name if not already provided.
-
Optionally enter the Car Weight (oz). If the race has a weight limit set, the box turns red and says so when the car is over it.
This is a warning, not a refusal — you can still check the car in. The inspector at the table decides what happens next; the app is only making the rule visible at the moment it matters. There is a small tolerance for the last decimal place, where desk scales disagree — see the weight check for exactly how close is close enough. 6. Optionally upload or capture a Racer Photo and/or Car Photo — each has an Upload File button and a Camera button. 7. Click Save Check-in.
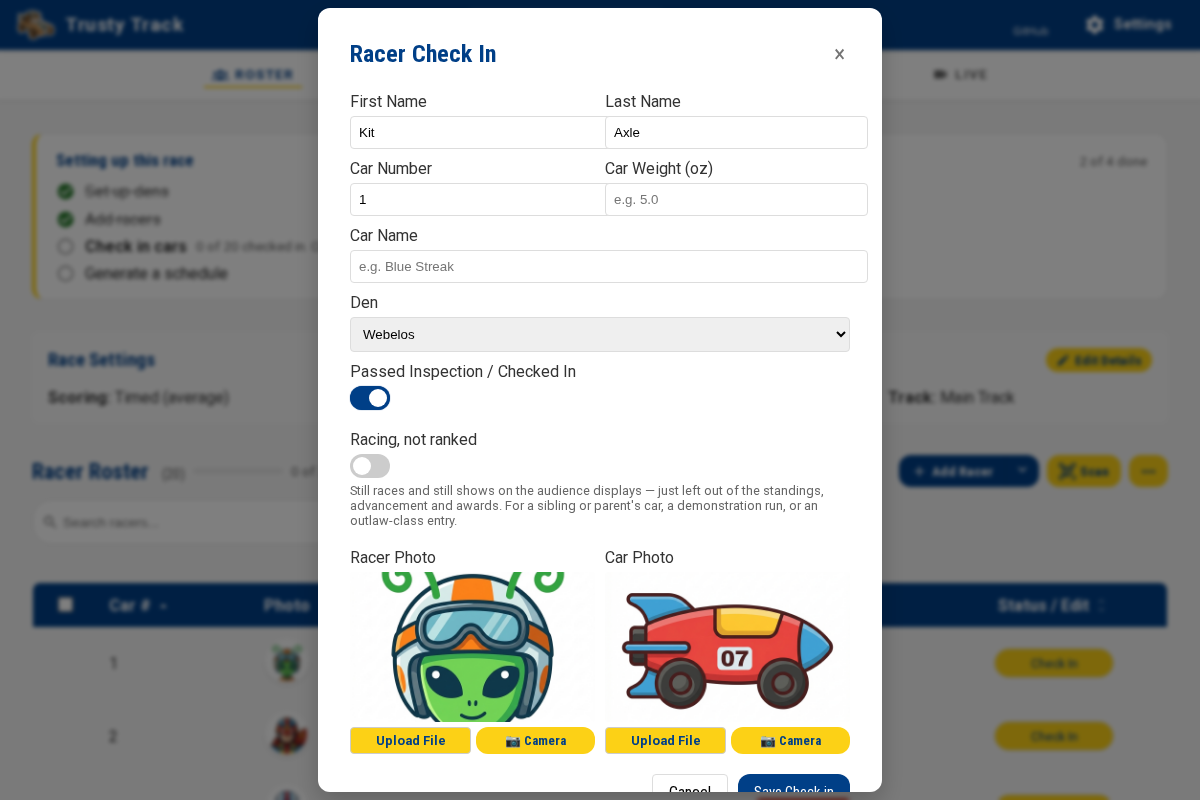 The check-in modal for a racer, with "Passed Inspection / Checked In" toggled on.
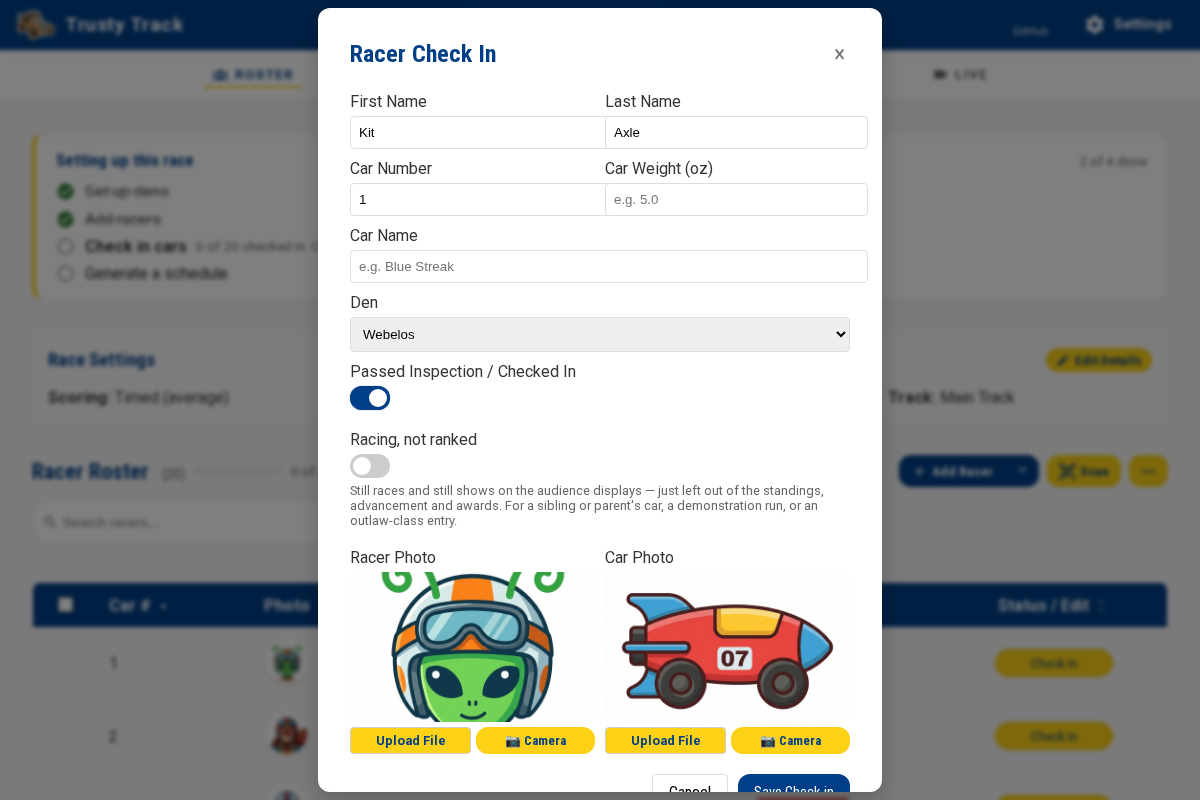 A racer photo loaded in the check-in modal. Photos appear on the live audience display during the race. Once a photo is on file, a ⟳ Rotate / Recrop button appears beneath it — see below.
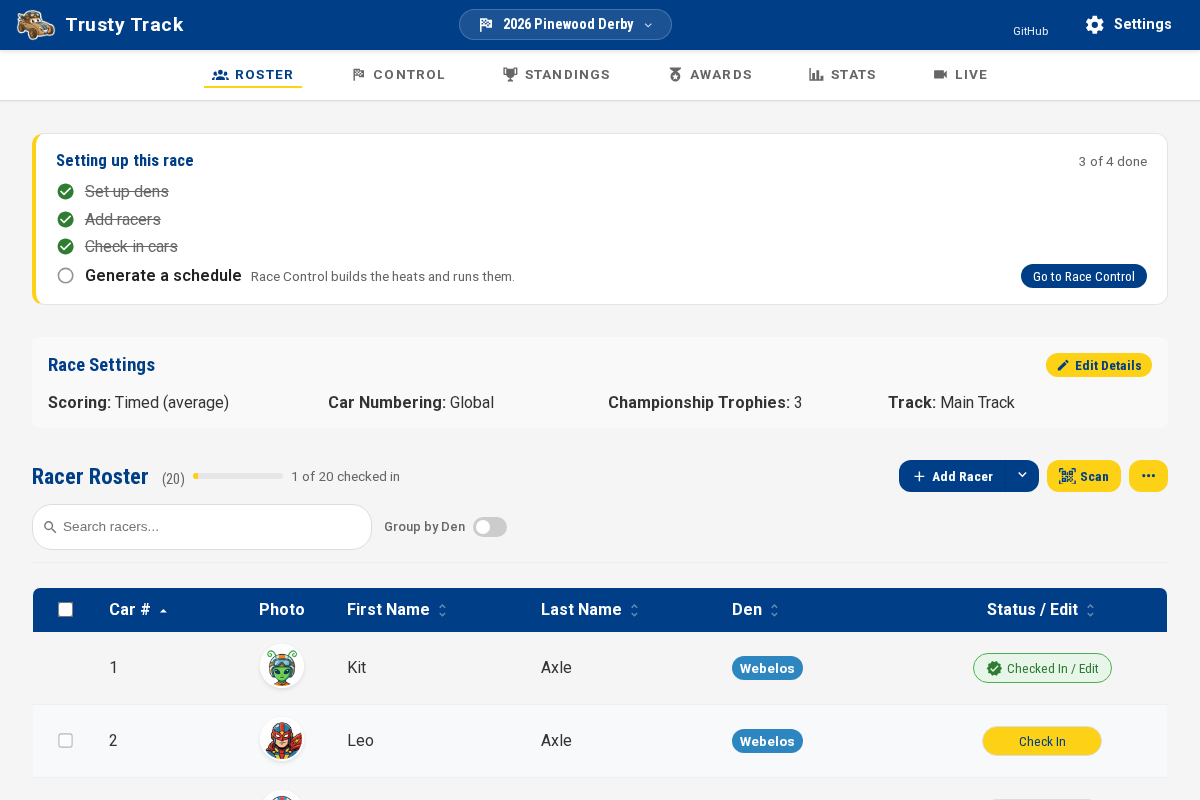 After saving, that racer's button turns green and reads Checked In / Edit. Clicking it again reopens the same form.
Straightening a Photo
Photos taken at the check-in table are rarely framed well — snapped sideways, off to one side, or with the car lost in a corner of the shot while table clutter fills the rest. Every racer and car photo can be rotated and recropped right in the browser, with no need to retake the picture.
- A photo taken with the Camera button goes straight into this step after you tap Capture — straighten and crop it before it is ever attached to the racer.
- A photo already on file — uploaded from disk, or captured earlier — gets a ⟳ Rotate / Recrop button beneath it. Click it to reopen the same tool on the existing photo.
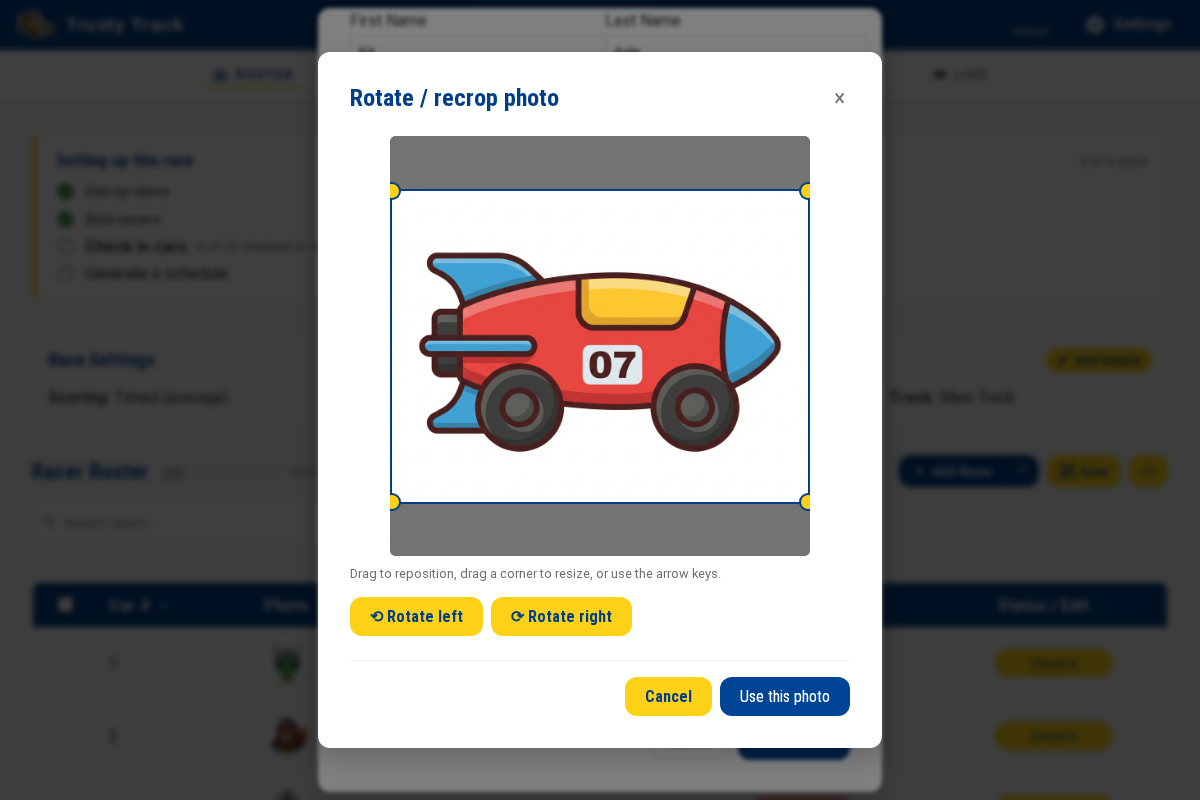 The crop tool open on a car photo. The blue box is the crop, with a gold handle at each corner to resize it; everything outside it is dimmed. Drag the box to reposition it. The two rotate buttons and the Cancel / Use this photo buttons sit below.
Drag the crop box to reposition it, or drag a corner to resize it — the arrow keys nudge it a little at a time. ⟲ Rotate left / ⟳ Rotate right turn the photo a quarter turn. A racer's own portrait crops to a square, matching the round photo used elsewhere in the app and on the pit pass; a car photo crops to a wider, landscape shape. Click Use this photo to keep the result, or Cancel (or press Escape) to leave the photo as it was.
All of this happens in your browser — nothing is uploaded until you confirm the crop, so a shot you decide not to use never leaves the device.
Scanning a Check-In Code
If you printed check-in codes (see the Printables guide), click Scan above the roster, hold a code up to the camera, and that racer's check-in form opens straight away — no searching a list of sixty.
There is a Car number box under the viewfinder for a creased code or a camera that will not focus.
Note
Scanning needs Chrome or Edge. In Safari and Firefox the panel opens without a viewfinder and the car number box is the way in — check-in is otherwise identical.
Tracking Check-In Progress
A checked in count sits beside the Racer Roster heading — "43 of 60 checked in" — so the question the room keeps asking can be answered without scrolling a list and counting buttons. It updates as check-ins land, including ones done on another device.
The Status column shows where every racer stands: a green Checked In / Edit button once they are through, a gold Check In button until then. Click the Status / Edit header to bring everybody still to come to the top. Turn on Group by Den to work through one den at a time, which is usually how families arrive.
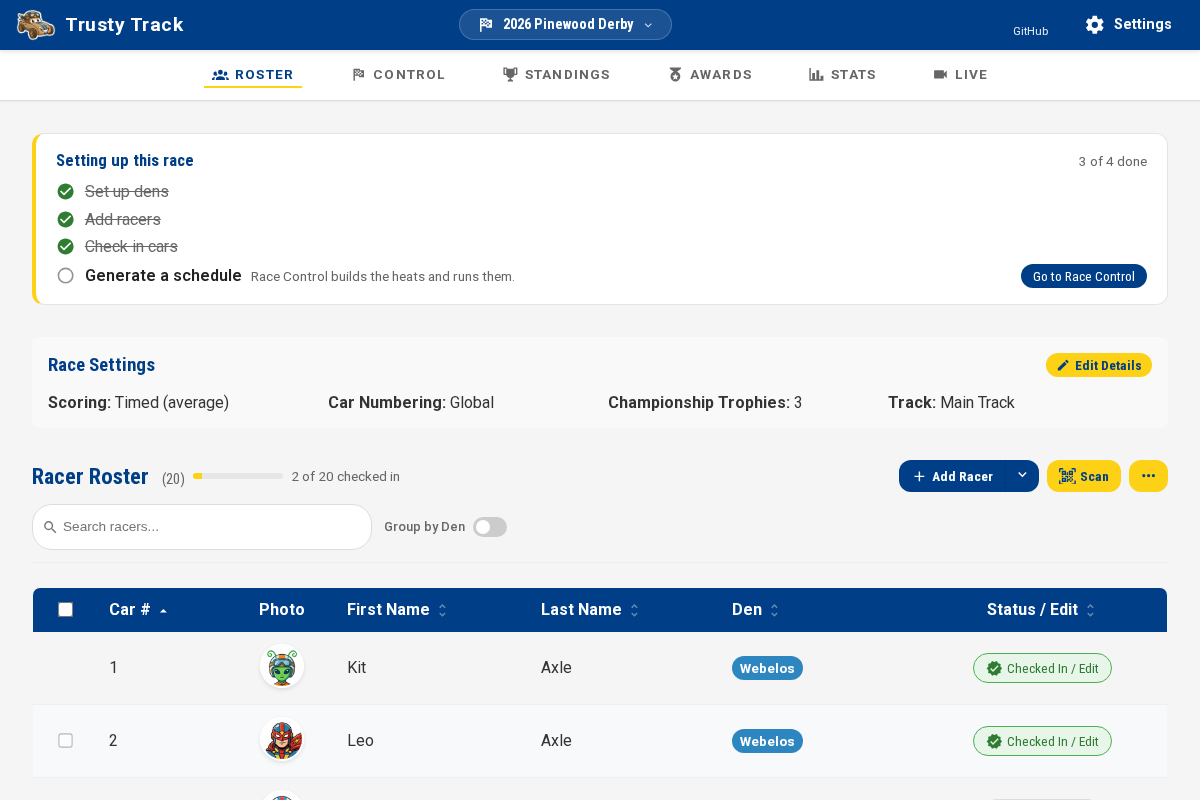 The roster part-way through check-in — green for done, gold for still to come, and the count beside the heading saying how far there is to go.
This view is behind the check-in desk's own screen, though — nobody else in the room can see it. Put it up where families can, instead: assign a screen to the Check-in progress view from Race Control → Displays, and the same question ("is my car through yet?") is answered by looking at the wall rather than asking the desk.
A second screen with the QR code view up at the entrance turns "here's our website, look us up later" into everyone having the live standings on their own phone before check-in even finishes.
Uploading Photos in Bulk
If a photographer takes portraits or car photos before the race, you can upload and assign all of them at once using the Upload Photos button — without opening each racer's check-in form individually.
When to use this: After a pre-race photo session where you have a folder of racer or car images to associate with the correct racers.
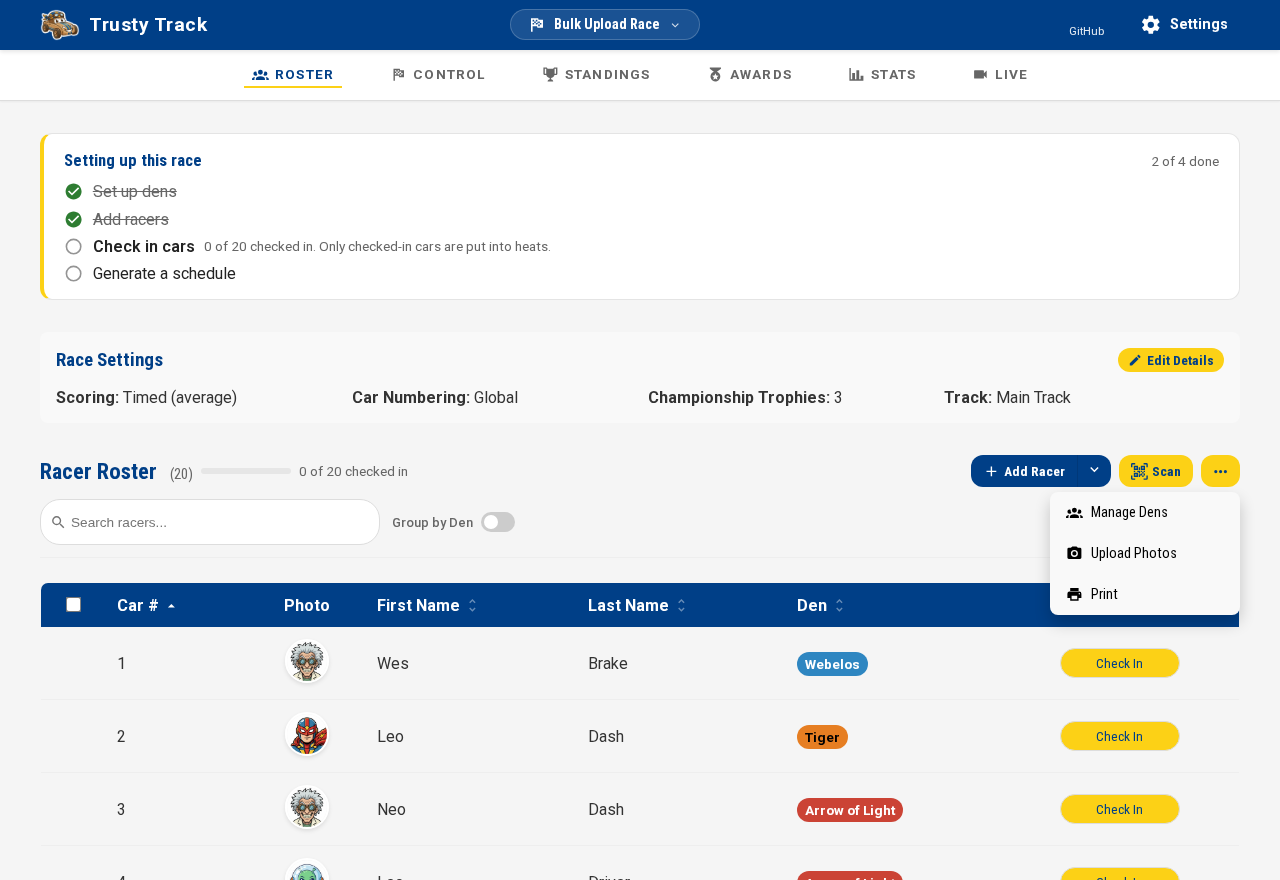 Upload Photos is in the ⋯ menu at the top right of the roster, between Manage Dens and Print.
- Click ⋯ at the top right of the roster and choose Upload Photos.
- The Upload & Assign Photos modal opens. Click Choose Photos and select one or more image files from your device.
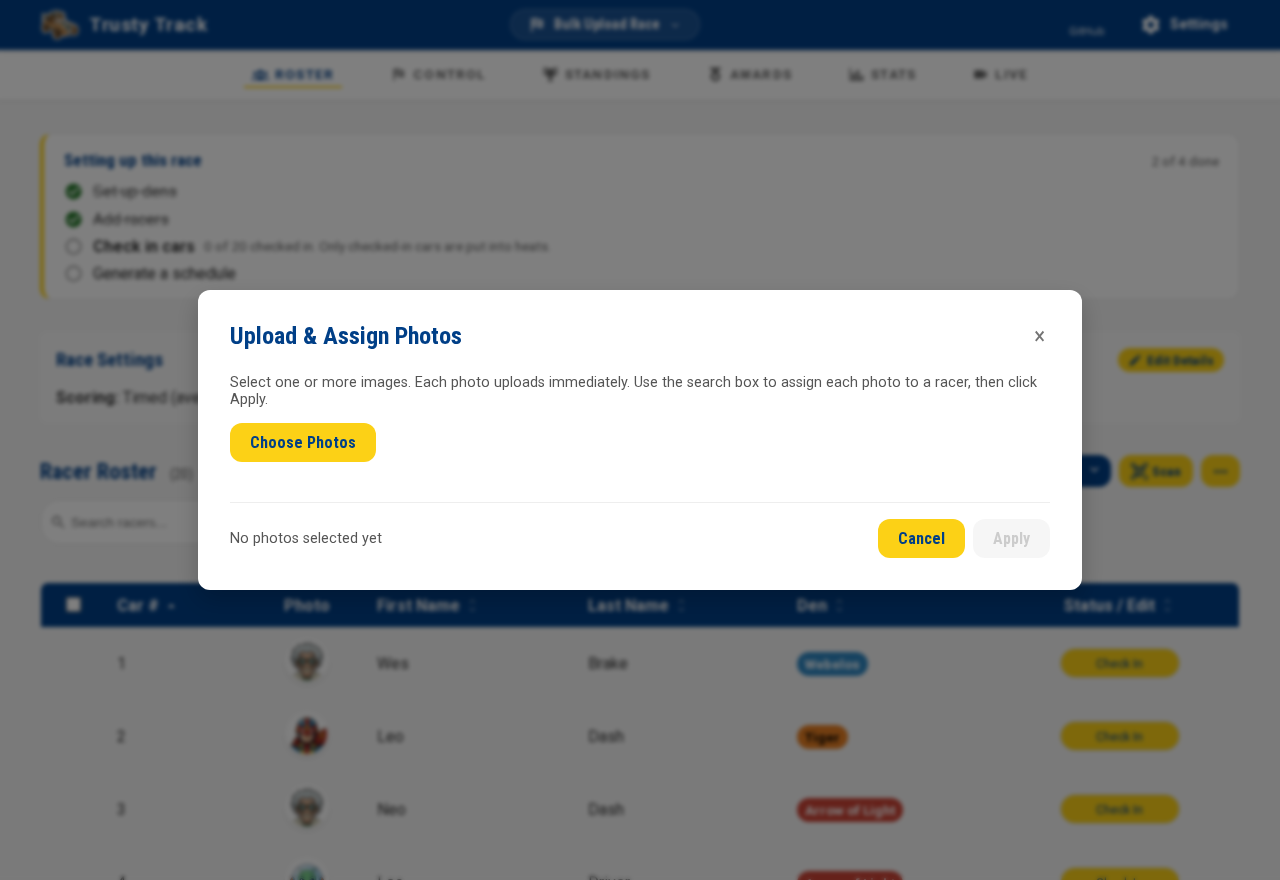 The modal before any photos are selected. Click "Choose Photos" to pick files from your device.
- Each image uploads immediately and appears as a thumbnail card. The footer shows how many photos have been assigned so far.
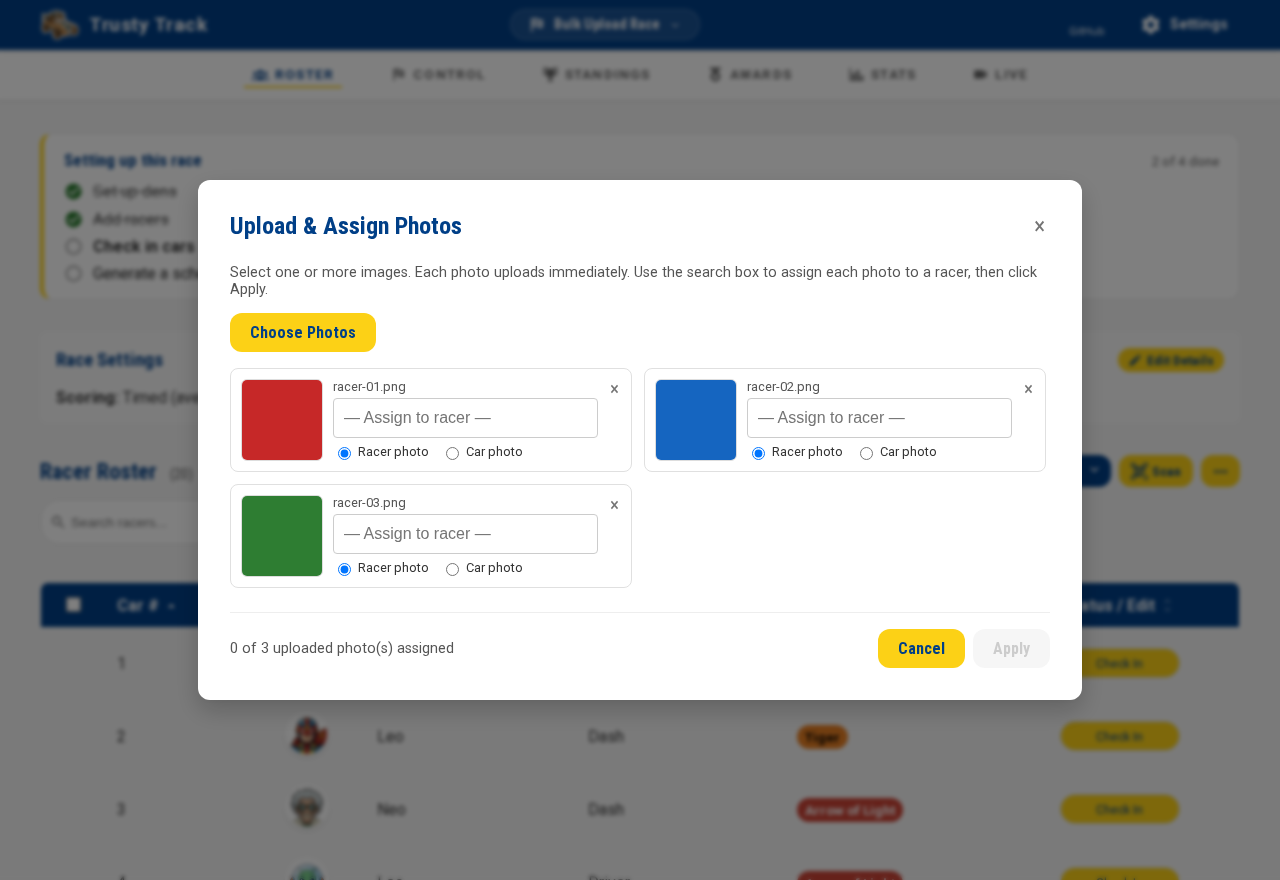 Three photos loaded and ready to assign. Each card shows the filename, an assignment search box, and a Racer/Car photo toggle. The footer tracks progress ("0 of 3 uploaded photo(s) assigned").
- Click the search box on a card and start typing a racer's name or car number. A filtered list appears as you type.
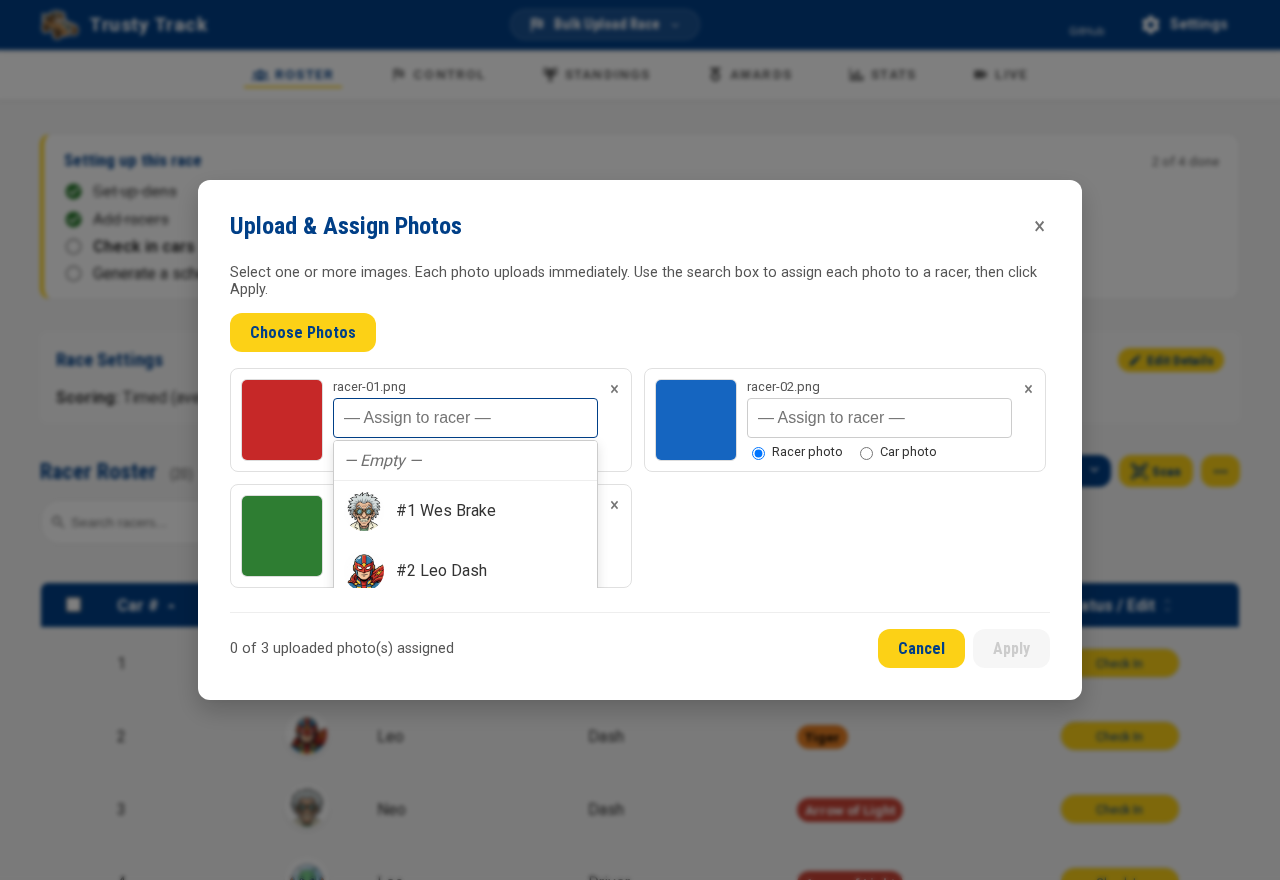 Clicking the search box shows all racers sorted by car number. Scroll or start typing to narrow the list.
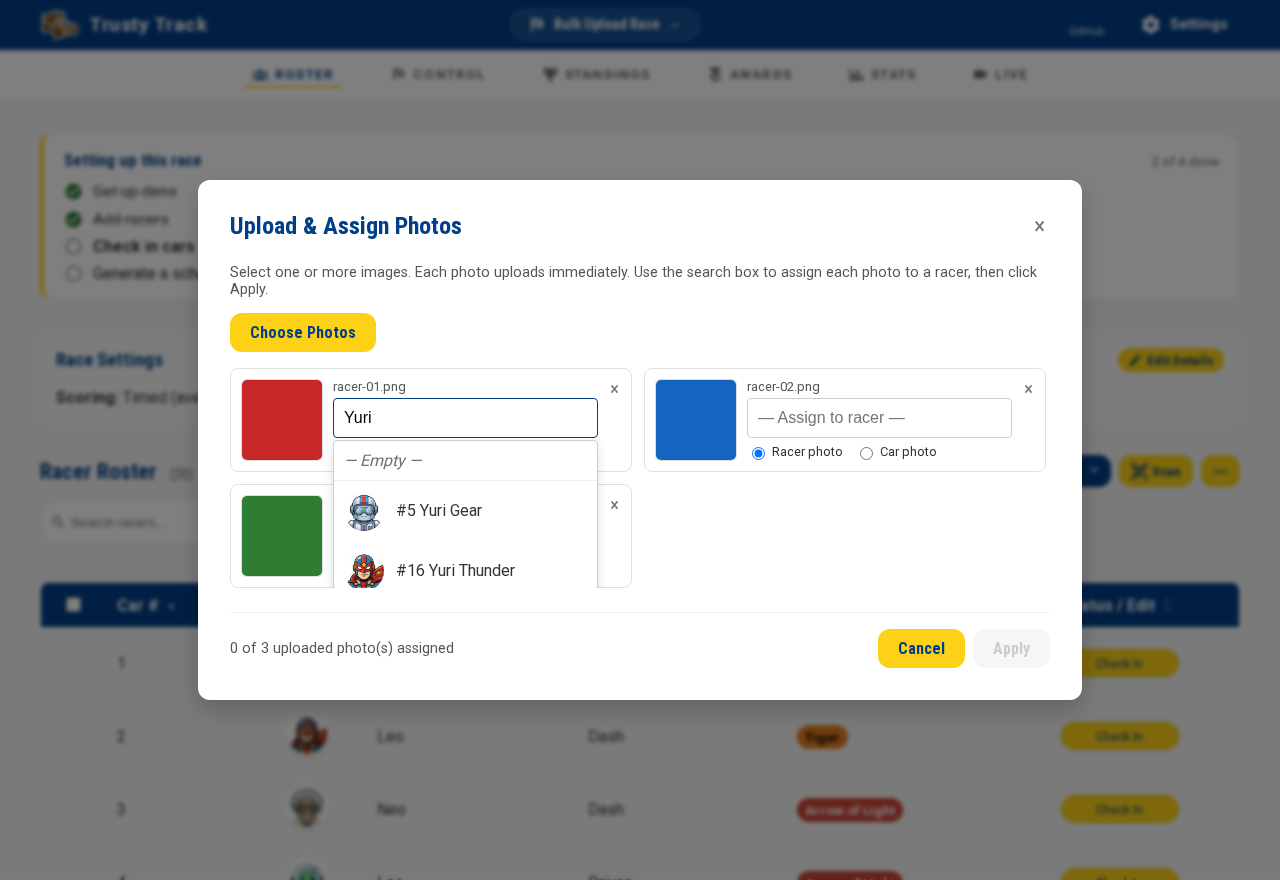 The list narrows as you type, matching on car number as well as name. Click a name to assign it, or use the arrow keys and press Enter; if nothing matches, the box says so.
- Use the Racer photo / Car photo radio buttons on each card to indicate what the image shows (default is Racer photo).
- After assigning all photos, click Apply N Assignment(s) to save.
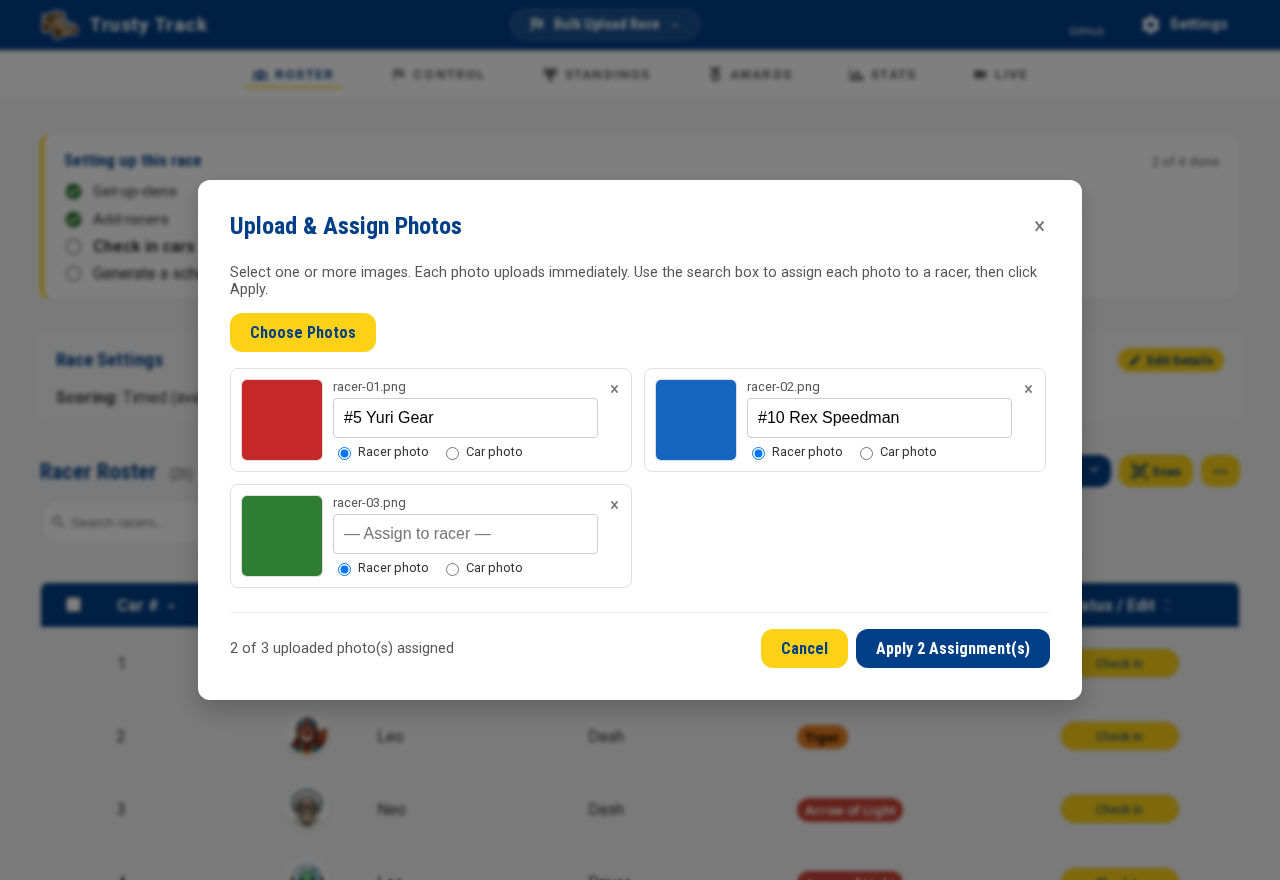 Two photos assigned and one still to go. Apply stays greyed out until at least one photo has a racer against it, and the footer beside it counts how many are ready.
Photos that are uploaded but not assigned to any racer are silently skipped — only photos with a racer selected are saved. Assignments can be applied at any time during or after check-in; the photos will be visible on the audience display during the race.
Tip
If an upload fails (for example, due to a slow network), a Retry link appears on that card. Other cards are not affected — you can assign and apply the successful uploads while retrying the failed ones.
Note
Photos can also be added individually through each racer's check-in form (see Checking In a Racer above). The bulk upload tool is most useful when photos were taken as a batch outside the app and you want to assign them all at once. A photo assigned this way has no rotate or crop step of its own — if one needs straightening, open that racer's check-in form afterward and use ⟳ Rotate / Recrop.
Part 2: Scheduling the Race
Navigating to Race Control
Once check-in is underway, the race control operator can move to the Race Control page to build the heat schedule. Click the Control link in the top navigation bar.
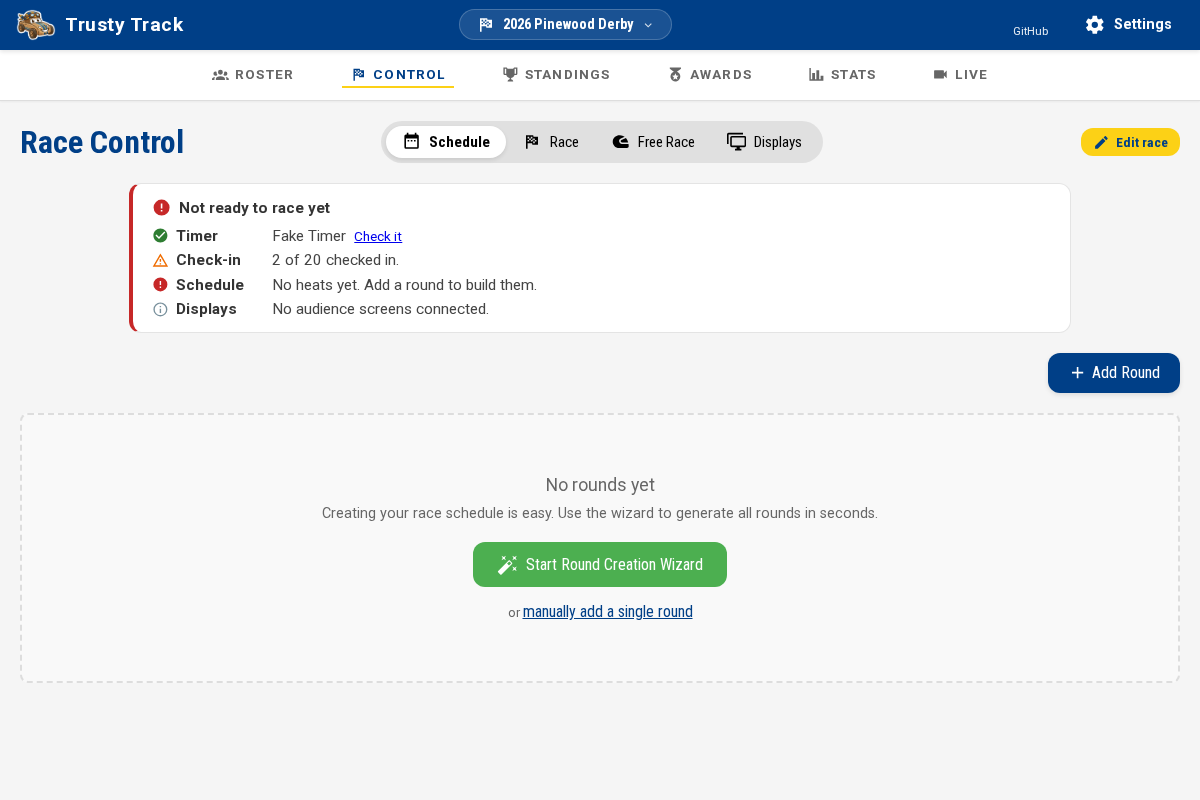 The Race Control page before any rounds have been added. The readiness panel at the top is reporting the missing schedule; click "Start Round Creation Wizard" to begin.
The Readiness Check
Until the first heat has been recorded, a readiness panel sits at the top of the Schedule and Race tabs. It answers the four questions that otherwise only surface as an error at the start line:
| Item | What it tells you |
|---|---|
| Timer | Whether the timer is connected and which model it reported. Check it opens the timer check page, which shows what answered and how well its support has been tested. |
| Check-in | How many cars are through inspection. Only checked-in cars are put into heats. |
| Schedule | How many heats exist. |
| Displays | How many audience screens are currently connected. |
Red means you cannot run a heat yet; amber means you can, but something is worth a look — a queue still at the check-in desk, most often. Displays are reported in grey because having no audience screen is a choice rather than a problem.
Once nothing needs attention the panel collapses to a single line, and it disappears entirely as soon as a heat has been recorded — from that point the timer badge and the race execution screen report anything that goes wrong.
Understanding Rounds and Heats
Two terms, before building the schedule:
- Heat — one race down the track: a handful of cars, one per lane, 10–30 seconds.
- Round — a set of heats where every racer competes. By default, every racer races in every lane exactly once.
A typical derby is one qualifying round (everyone) plus one optional championship round (top finishers). More terms are in the glossary.
Creating a Round with the Round Wizard
The Round Wizard is the fastest way to set up your complete race schedule, including optional championship rounds. Click Start Round Creation Wizard to open it.
Step 1: General Rounds
Choose the format for your qualifying round:
- All Pack — Every racer races against everyone else. Best for events where den membership isn't important for heat grouping.
- By Den — Racers race only against others in their own den during the qualifying round.
Set Runs Per Lane (default: 1). Increasing this number means each racer runs in every lane more than once, which produces fairer averages but takes more time.
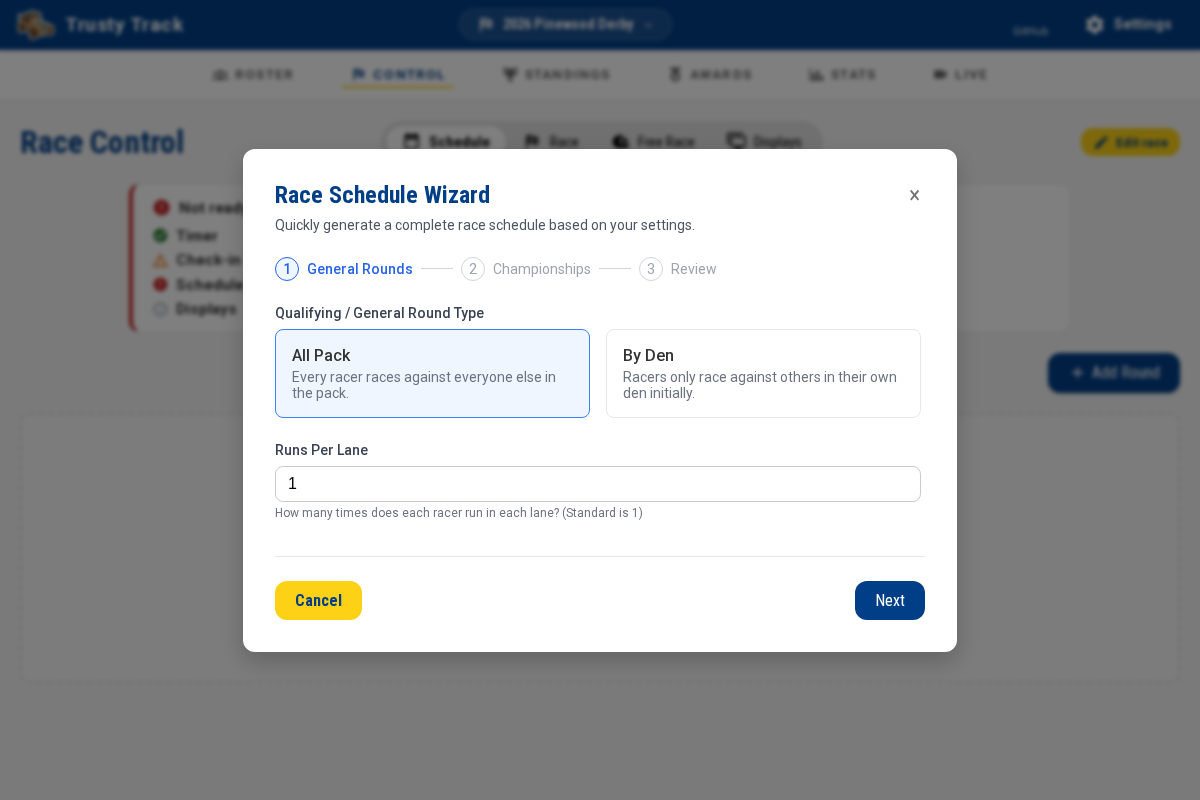 Step 1: choose the qualifying round type. "All Pack" is the most common choice.
Step 2: Championship Rounds (Optional)
Add one or more championship rounds. For each championship round, configure:
- Round Name (e.g., "Grand Finals")
- Who advances: Top Overall (Pack) or Top per Den
- How many advance — the box is labelled Number of Finalists for Top Overall, and Advancing per Den for Top per Den
- Runs Per Lane for this round — the finalists race the whole round again for each run, which is worth it when a final is close enough that one heat should not decide it
Click + Add Round to add more championship rounds if needed. Only the first championship round chooses a source; any round after it always draws from the championship round before it, and says so instead of offering a choice.
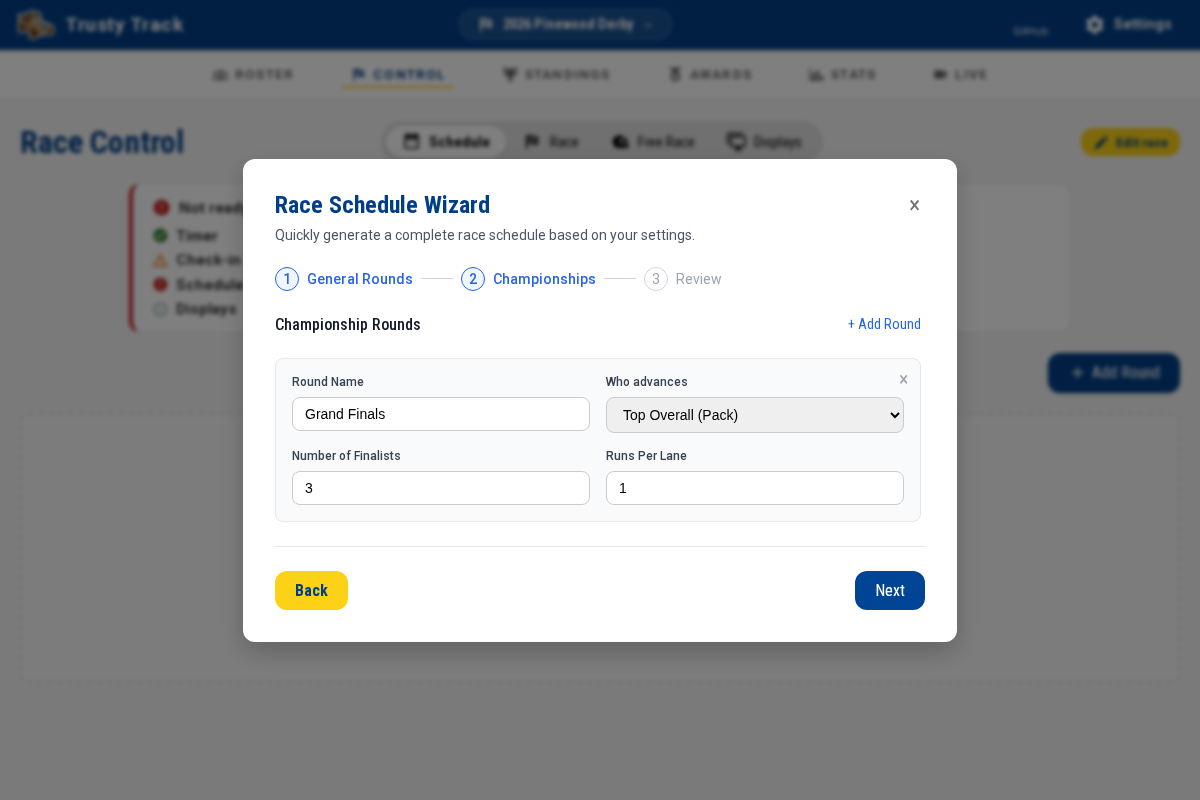 Step 2: configure optional championship rounds. Each round can advance a different number of racers.
Step 3: Review and Generate
The wizard shows an estimate of total heats and approximate run time. Review the schedule summary, then click Generate Schedule to create all rounds and heats at once.
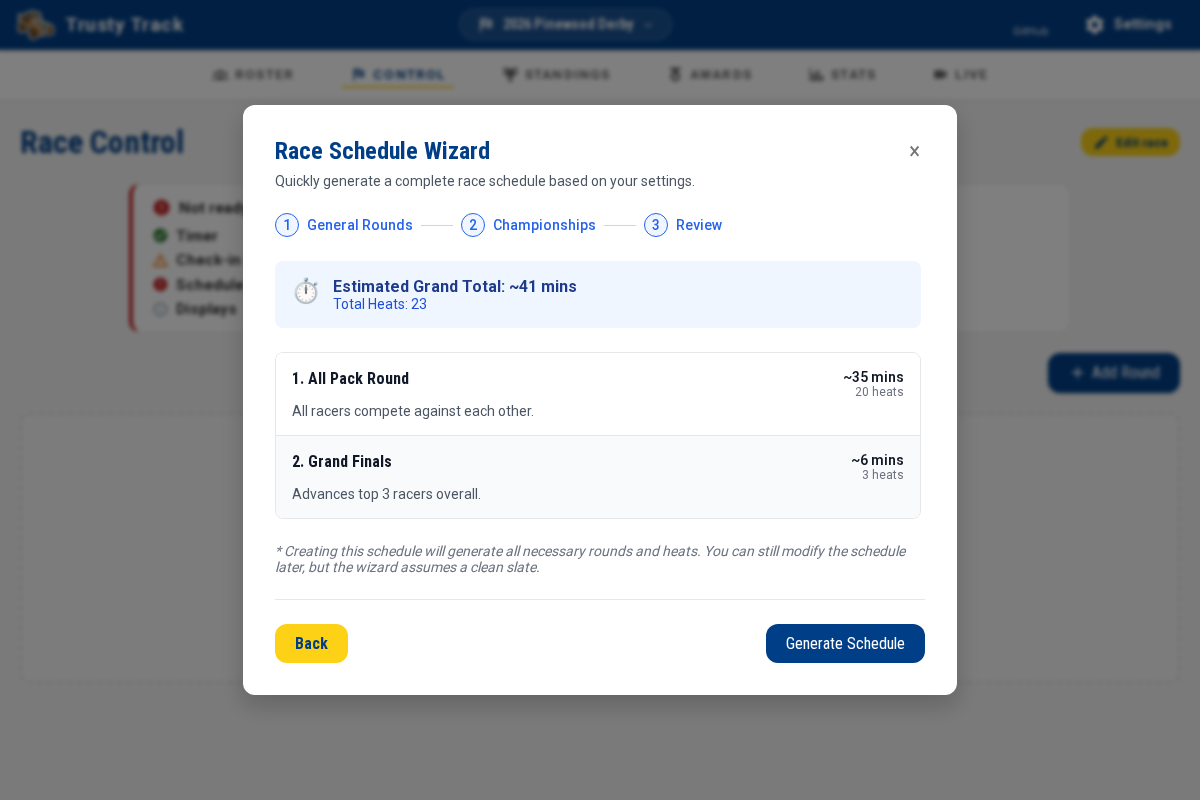 Step 3: the schedule preview shows total heats and estimated duration before you commit.
Viewing the Schedule
After generating, the Schedule tab lists each round in turn, one below the other. A round is a table with a row per heat and a column per lane, so reading across a row tells you who is in which lane.
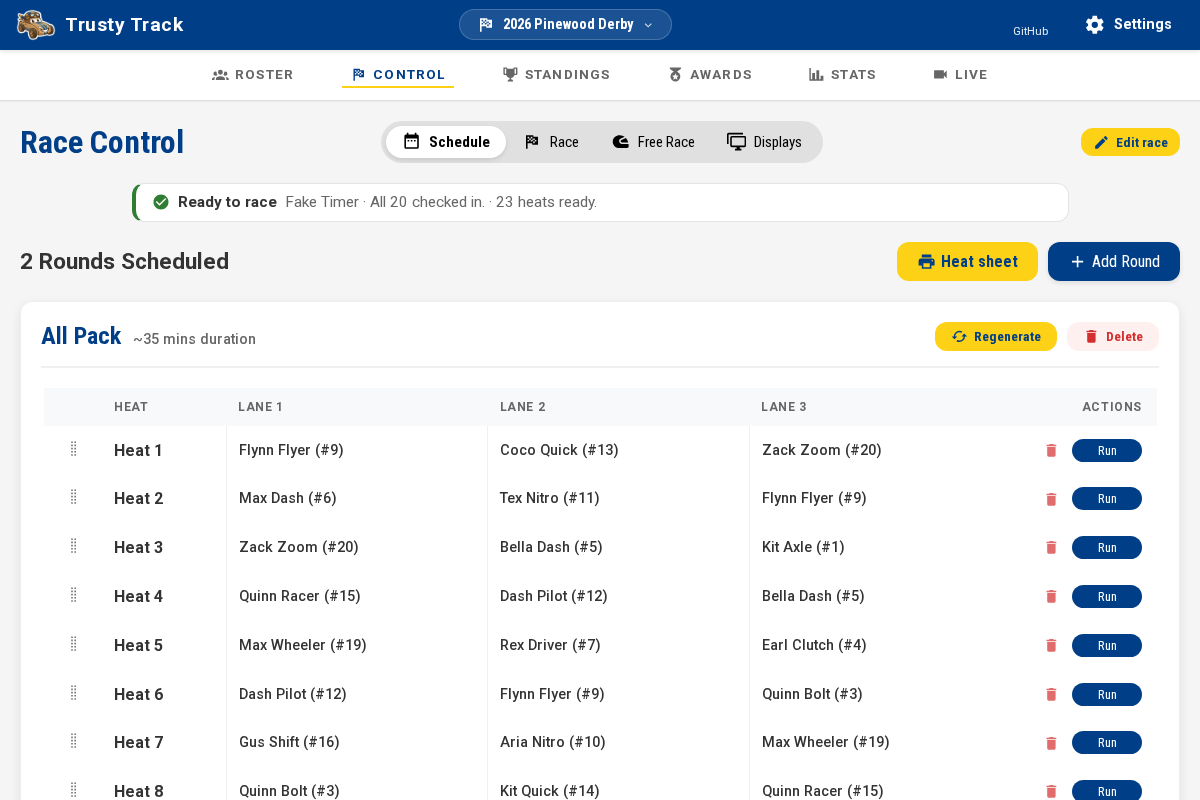 The full schedule after generation. Each round has its own table; a heat's row shows the racer in every lane, and picks up their finish times once it has been run.
Adding a Round Later
You do not have to decide everything in the wizard. Add Round, at the top of the Schedule tab, adds one more round at the end of the schedule — a general round everyone races, or another championship round.
A championship round added here can draw its racers from the overall standings, from each den, or — once another championship round exists — from that round's results, which is how you get "top ten race a semifinal, top three of them race the final". If the round it draws from has already finished, the new round fills in with the qualifiers straight away; otherwise it fills in on its own the moment they are decided.
The three ways a general round can be raced — every lane for everyone, balanced, elimination — are compared in Scoring & Championships, with the full rules in Round styles. The sections below show how to set up each one.
Balanced Racing
More children win a heat: after a random start, the winners race the winners, so the other heats are winnable.
- Click Add Round and choose Balanced.
- Pick how many times each car races. Once per lane is the usual advice and the default.
- Run the heats on the screen. The next set appears by itself when they are done.
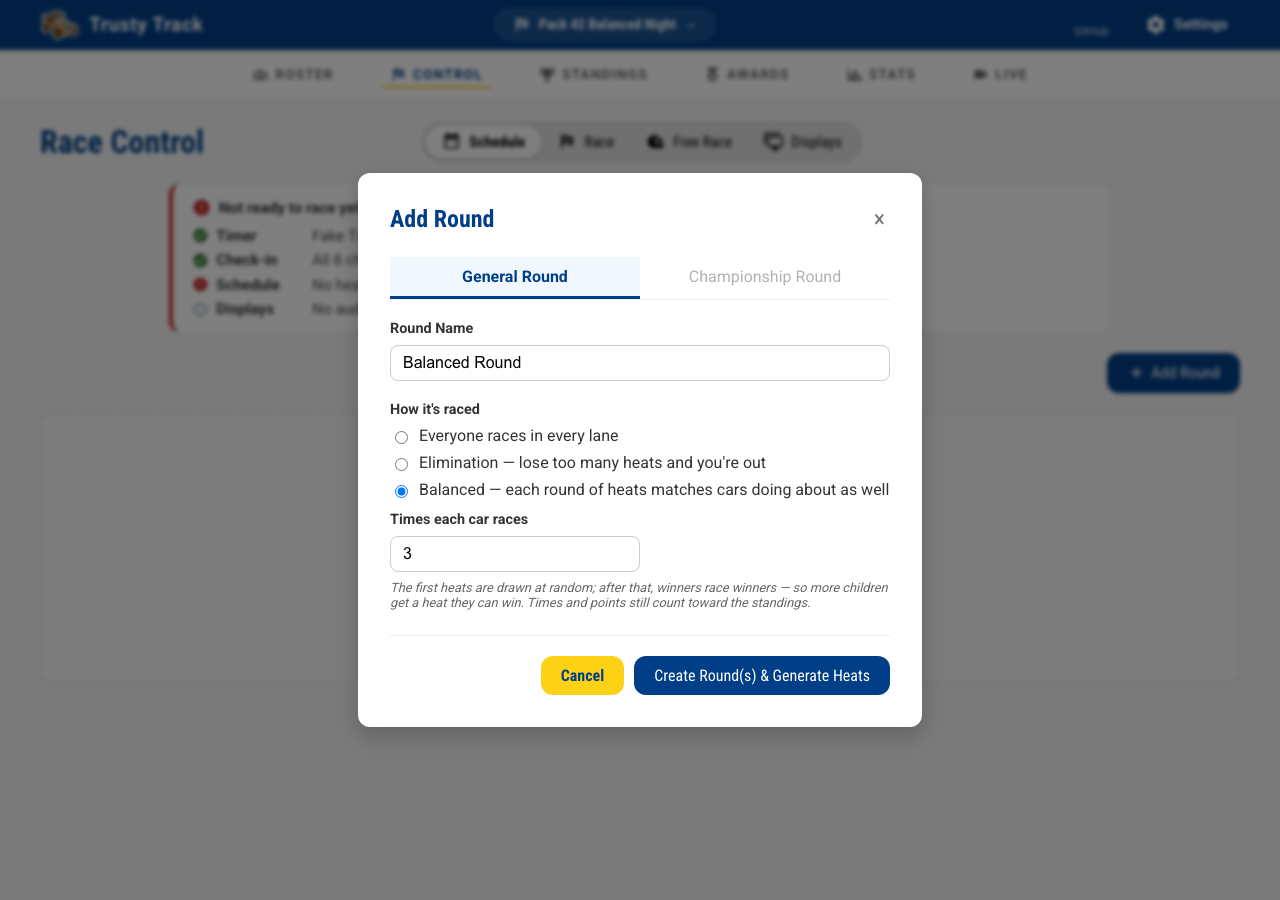 The Add Round dialog with Balanced chosen: pick how many times each car
races and go.
The Add Round dialog with Balanced chosen: pick how many times each car
races and go.
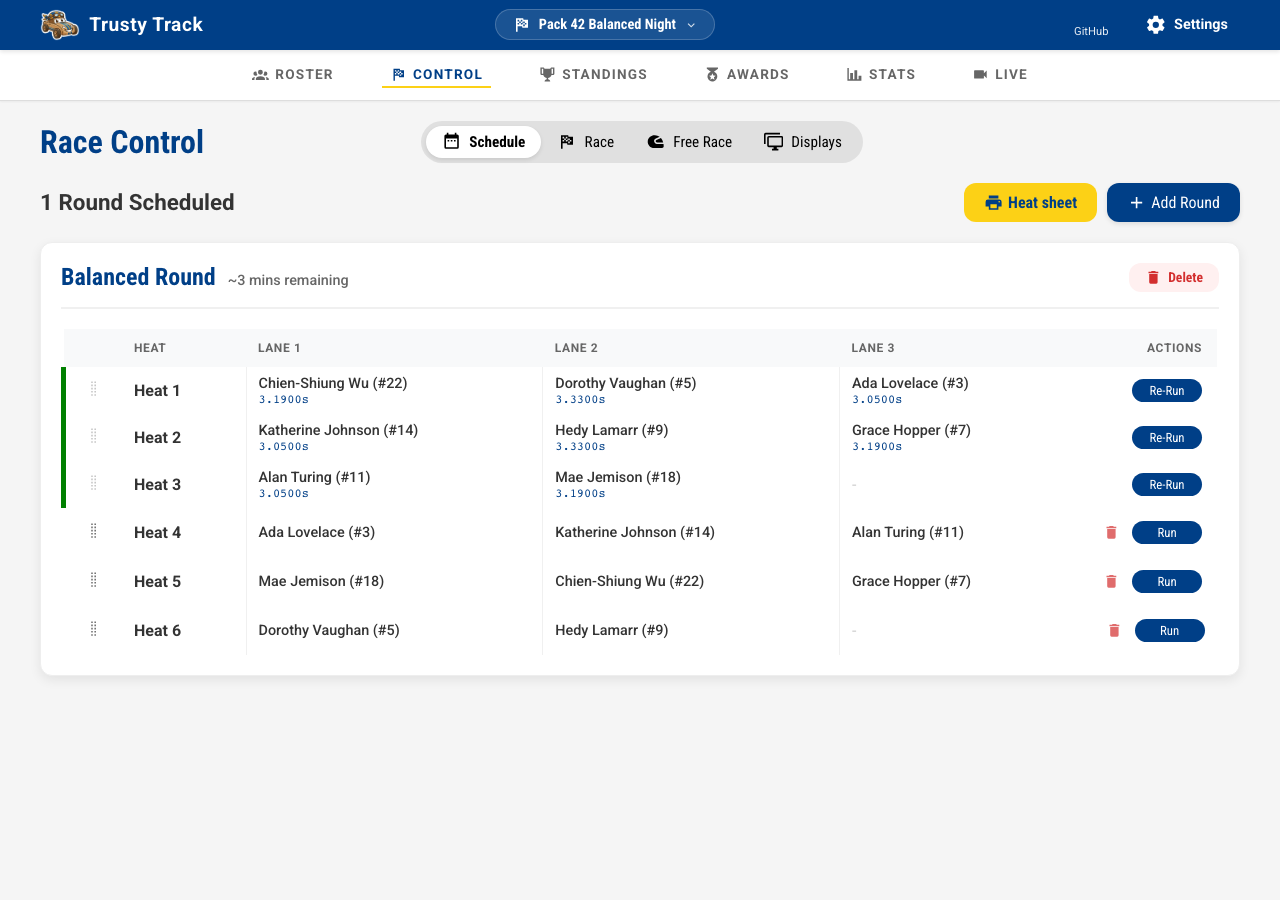 The schedule after the first round of heats: the next set has appeared, with
the heat winners matched against each other.
The schedule after the first round of heats: the next set has appeared, with
the heat winners matched against each other.
Nobody is eliminated, everyone races the same number of times, and results count toward the standings as usual. A late arrival joins the next set. The full rules are in Round styles.
Elimination Racing
The classic "lose too many and you're out" — with no bracket to draw and nothing to reprint when somebody does not show up.
- Click Add Round and choose Elimination — lose too many heats and you're out.
- Pick how many losses a car is allowed. Three is a good default.
- Run the heats on the screen. New sets appear by themselves, matching cars with the same record — the undefeated race the undefeated.
A loss is any heat a car does not win — second place counts the same as fourth. The last car left wins, and the Standings page shows the round as a loss count, cars still racing listed first.
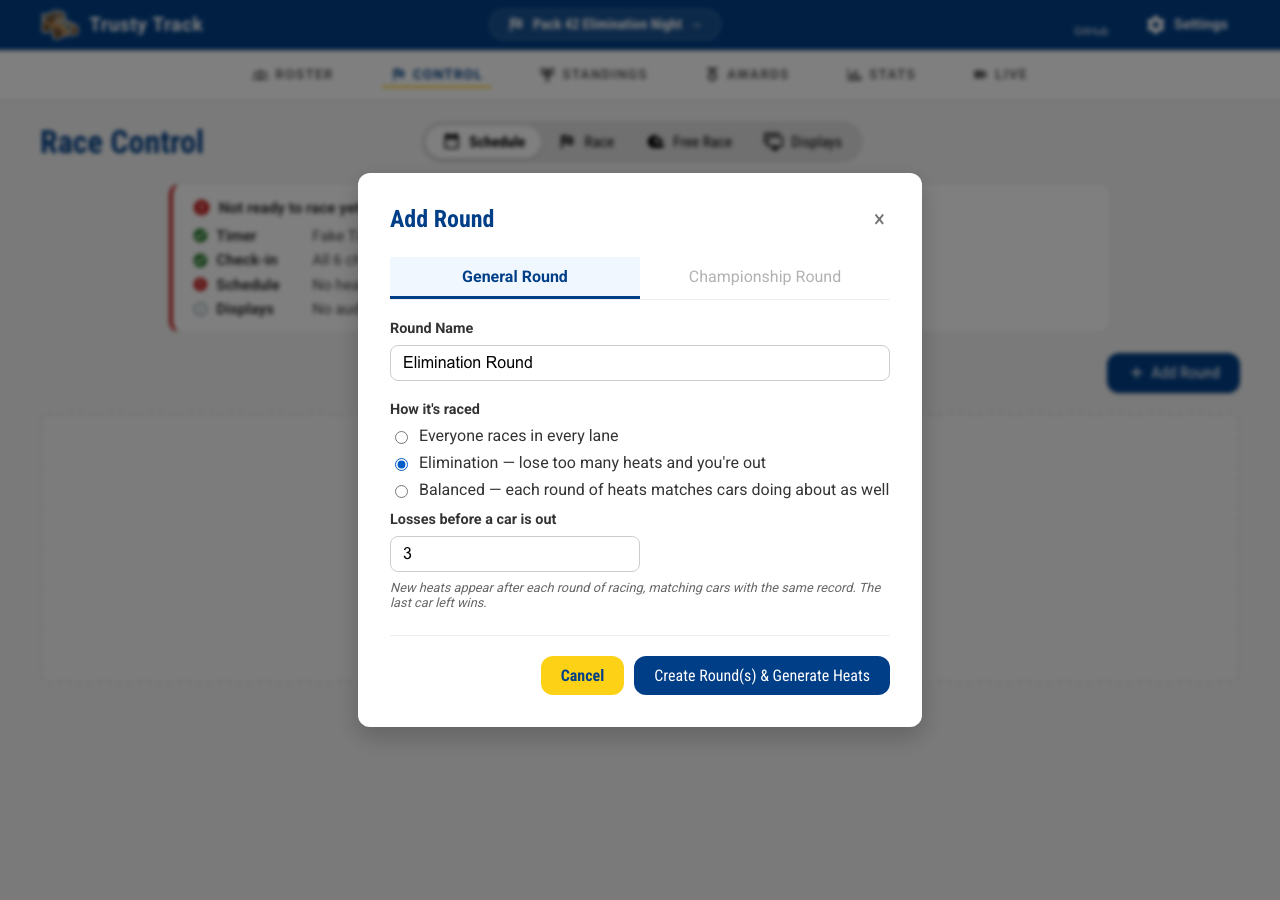 The Add Round dialog with elimination chosen: pick the loss limit and go —
there is no chart to manage.
The Add Round dialog with elimination chosen: pick the loss limit and go —
there is no chart to manage.
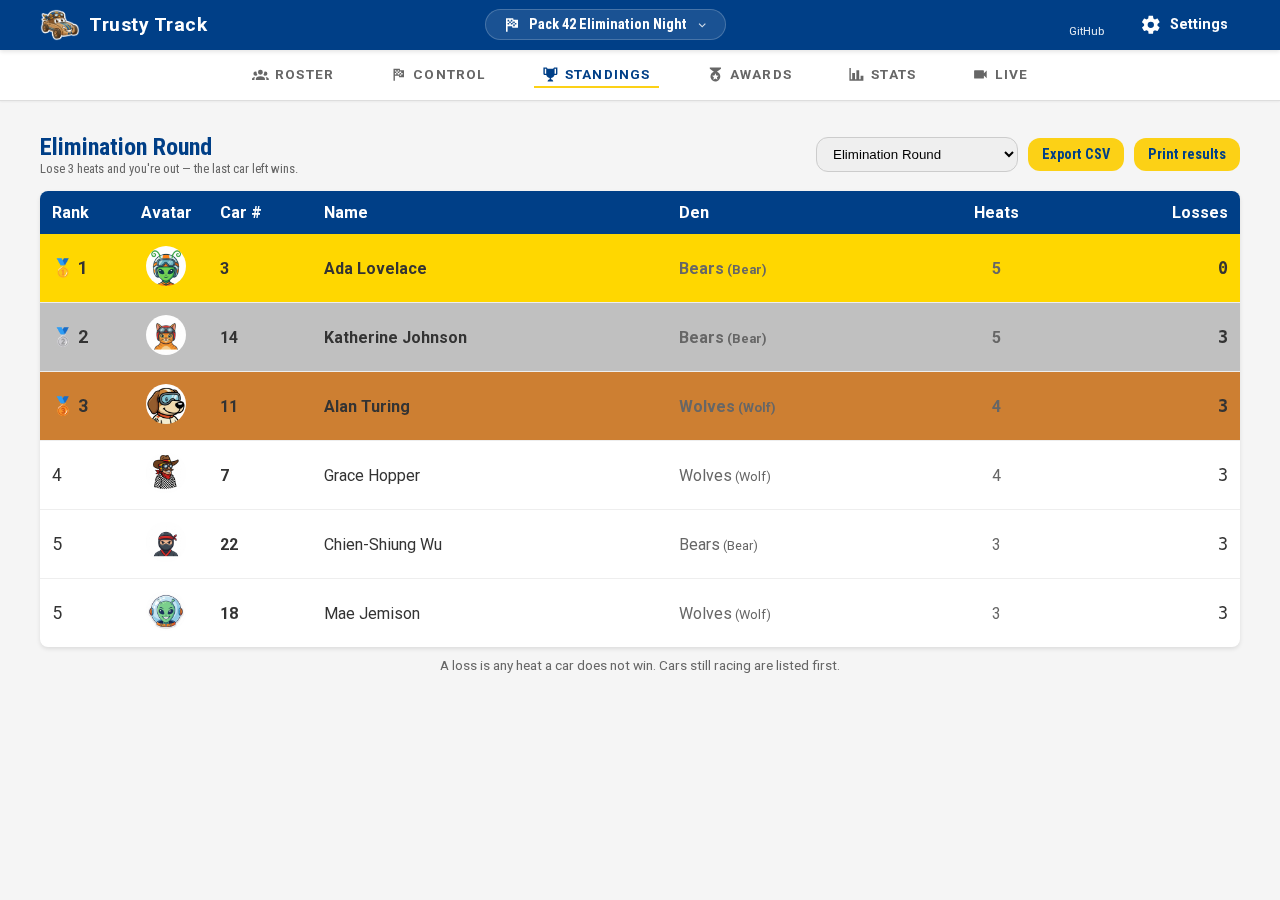 The Standings page during an elimination round: losses instead of times,
cars still racing at the top.
The Standings page during an elimination round: losses instead of times,
cars still racing at the top.
Elimination heats stay out of the overall standings — an eliminated car races fewer heats, so no average over them is fair. The full rules, including late arrivals and what counts as a loss, are in Round styles.
The Slowest Race
A crowd favorite: after the serious racing, let the slowest cars have their moment.
- Click Add Round and pick the Championship Round tab.
- Choose The slowest cars instead of the fastest.
- The round fills itself with the slowest cars, and runs like any other.
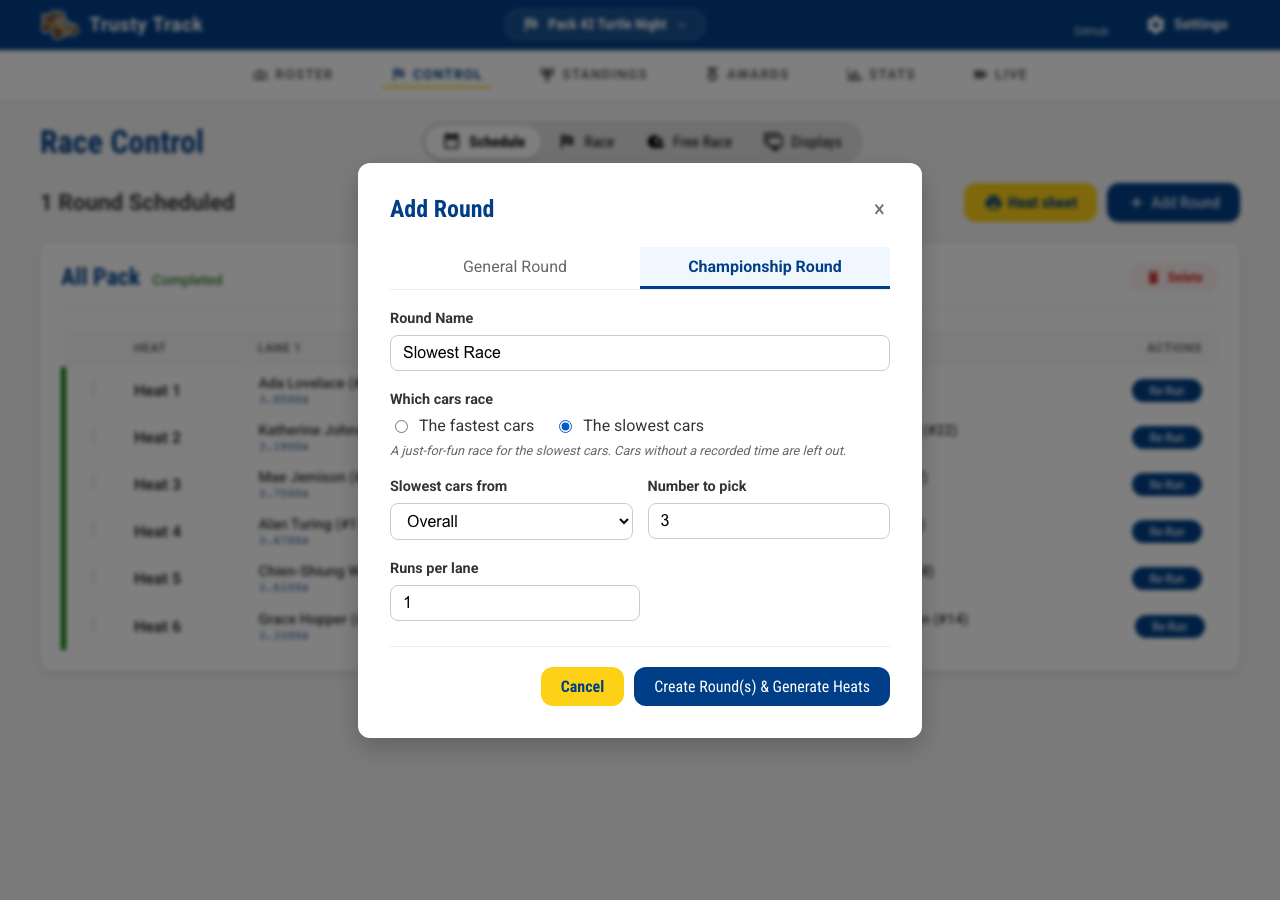 The Add Round dialog with The slowest cars chosen. The round names itself
"Slowest Race", and the pick count is free of the trophy minimum — a two-car
turtle race is a fine turtle race.
The Add Round dialog with The slowest cars chosen. The round names itself
"Slowest Race", and the pick count is free of the trophy minimum — a two-car
turtle race is a fine turtle race.
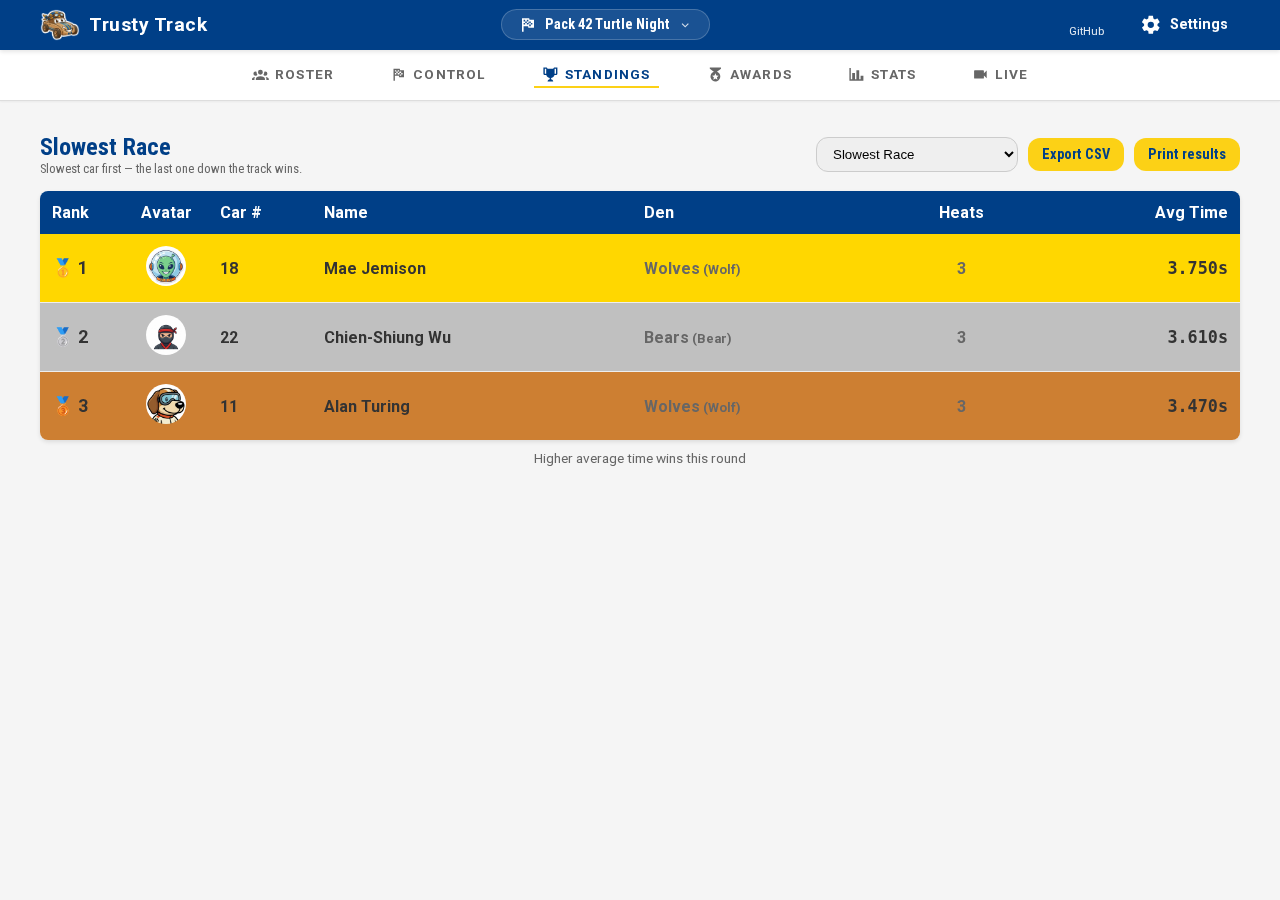 The Standings page showing a Slowest Race round: the slowest car is listed
first, because the last one down the track wins.
The Standings page showing a Slowest Race round: the slowest car is listed
first, because the last one down the track wins.
Cars that never recorded a time are left out, and the round's standings list the slowest car first — the details are in Championship rounds. Pair it with a judged award (like "Turtle Trophy") on the Awards tab if you want to hand out hardware for it.
Reordering Heats (Optional)
If you need to adjust the heat order before racing begins (for example, to separate siblings or accommodate a late arrival), drag a heat by the handle at the left-hand end of its row to move it within its round.
Note
A heat can only be moved while it has no times against it. Once a heat has been run its handle is greyed out; a heat you skipped can still be moved, because it has no times.
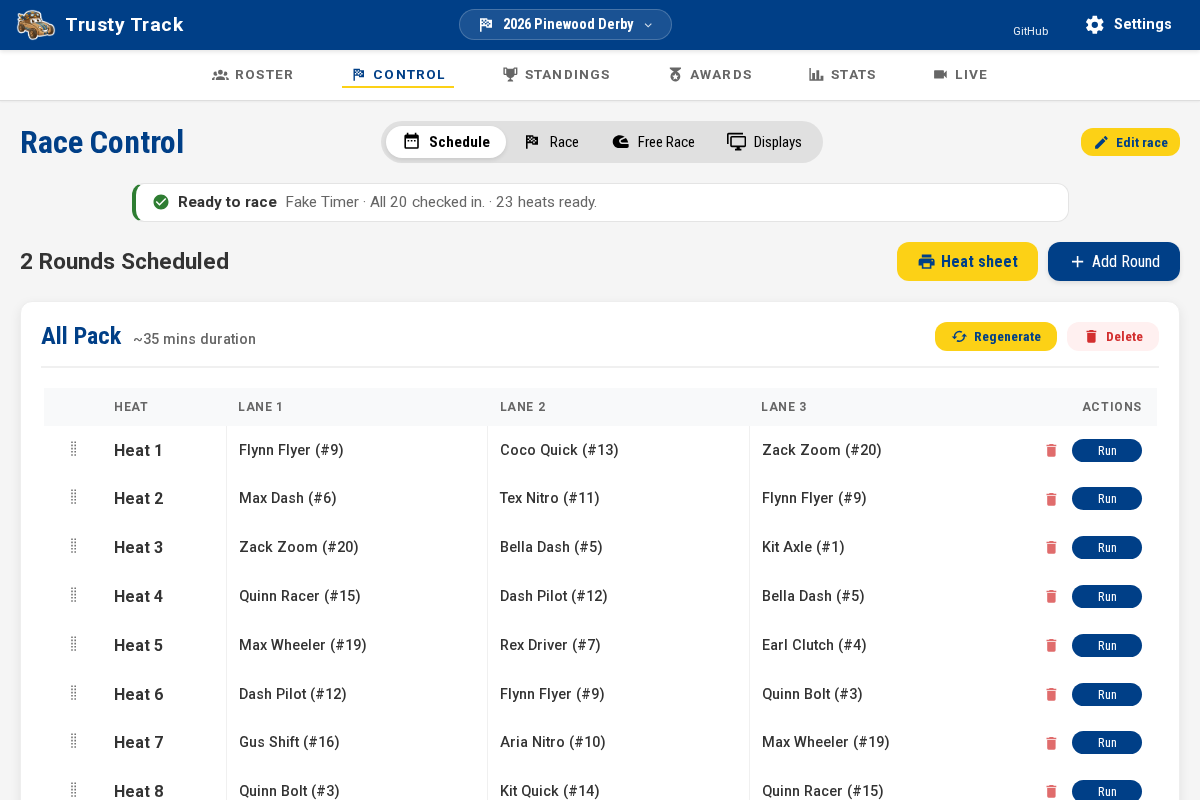 Drag the handle at the left-hand end of a heat's row to reorder it within the round.
Tip
Print the running order once the schedule is settled. Heat sheet, beside Add Round, gives you a table per round with an empty column to write results into — the one thing that still works when the wifi drops. See the Printables guide.
Tip
Jumping Ahead: If you want to run a later heat immediately, click the Run button on that heat in the Schedule view. Trusty Track will automatically move it to be the next heat in the order and take you directly to the Race tab. This only works within the round you are on — Run is greyed out on a round that is still waiting for an earlier one to finish.
Running Several Dens at Once (Optional)
By default, each den races its own round as a block — the Lions straight through, then the Tigers, and so on — and the track sits idle between blocks while the next den's cars are collected and staged. If your pack has several dens racing the same event, Interleave heats across every den weaves every den's heats into one running order instead, so the next den is already staged while the current one races.
- Tick Interleave heats across every den on the race form — edit the race from the Roster page if it already exists.
- Build your rounds exactly as you would for any other race — one round per den, raced however you like.
- On the Schedule tab, a Master running order panel appears above the per-round tables. Click Apply master order to weave the dens' current heats together.
Once applied, the Race tab and the audience displays follow the woven order — after a Lion heat the next heat offered is usually a Tiger heat, with its line-up already showing in On Deck. Any pending heat can also be run straight from the Schedule tab, whatever round it belongs to, and dragging heats within a round is switched off while the setting is on — a hand-reorder would pull that round out of the weave.
Nothing about how a den's own round is scheduled changes — only the order the heats run in. Full rules, including how a late arrival or a dead lane is folded into the running order without disturbing a heat already called, are in Running order across groups.
Part 3: Running the Race
The Race Execution View
Switch to the Race tab in Race Control to enter the race execution view. This is where heats are started and results are recorded.
The view is split into two columns:
- Left (main area): The current heat — racer names, lane assignments, and results.
- Right (sidebar): On Deck — the next heat's lane-up, so those cars can be staged — with the round's progress below it and any later rounds after that. The progress panel shows an estimated finish time and pace for the round, which starts as a rough guess and gets more accurate as heats are actually recorded — it learns this event's own rhythm rather than assuming a fixed time per heat.
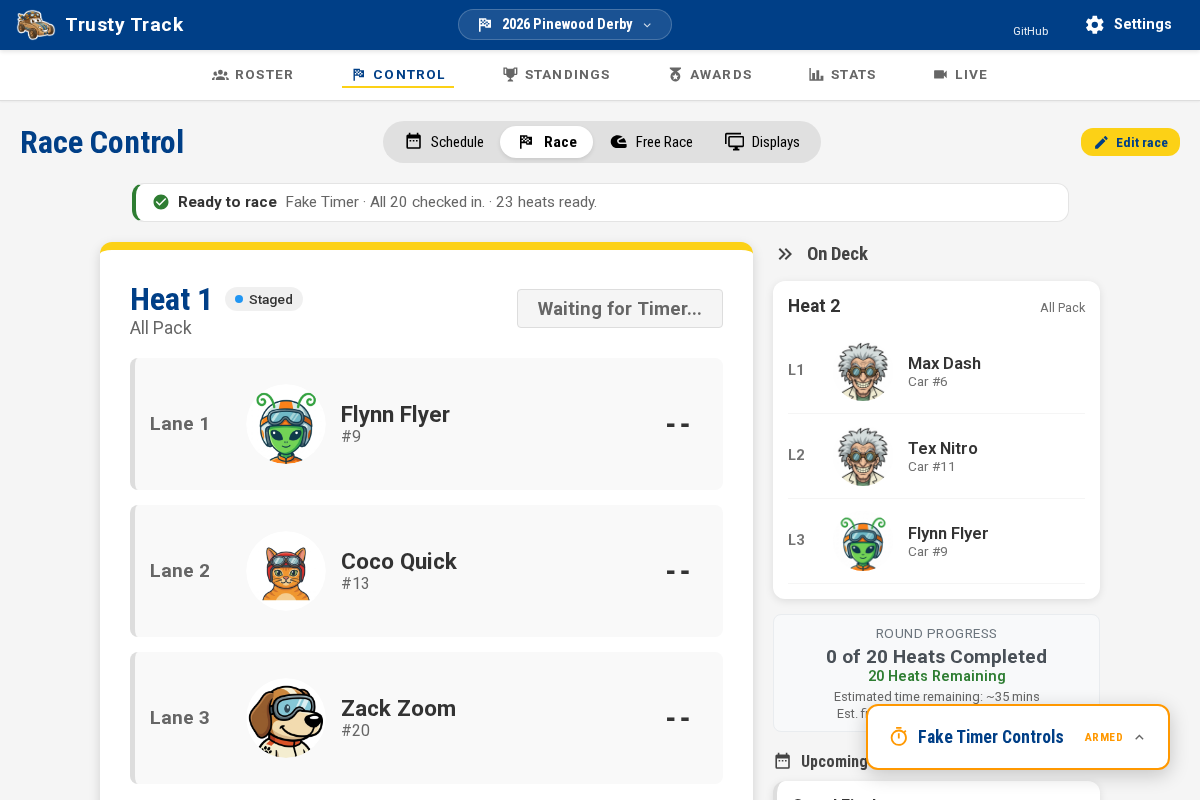 The Race Execution view showing the active heat with lane assignments. The On Deck panel beside it is the next heat, so those cars can be staged.
Starting a Heat
How a heat starts depends on your track timer:
- With a hardware timer: Trusty Track automatically prepares the timer for the next heat. Place the cars on the track and release them as normal — the timer records finish times automatically.
- With the fake timer (for testing without a physical track): A Fake Timer Controls panel appears in the bottom-right corner. Once the heat is staged the panel reads "Ready to start" — click Start Timer to send the cars off. The heat then finishes on its own a few seconds later, or you can click Finish Heat to end it immediately.
- With no timer at all: nothing is armed and there is no "Waiting for Timer…" message — the main button on the heat is Enter Results, and hand entry is how every heat gets recorded. See No timer.
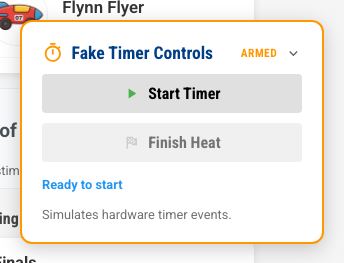 The Fake Timer Controls panel used for testing. "Start Timer" begins the run; "Finish Heat" ends it and records simulated times.
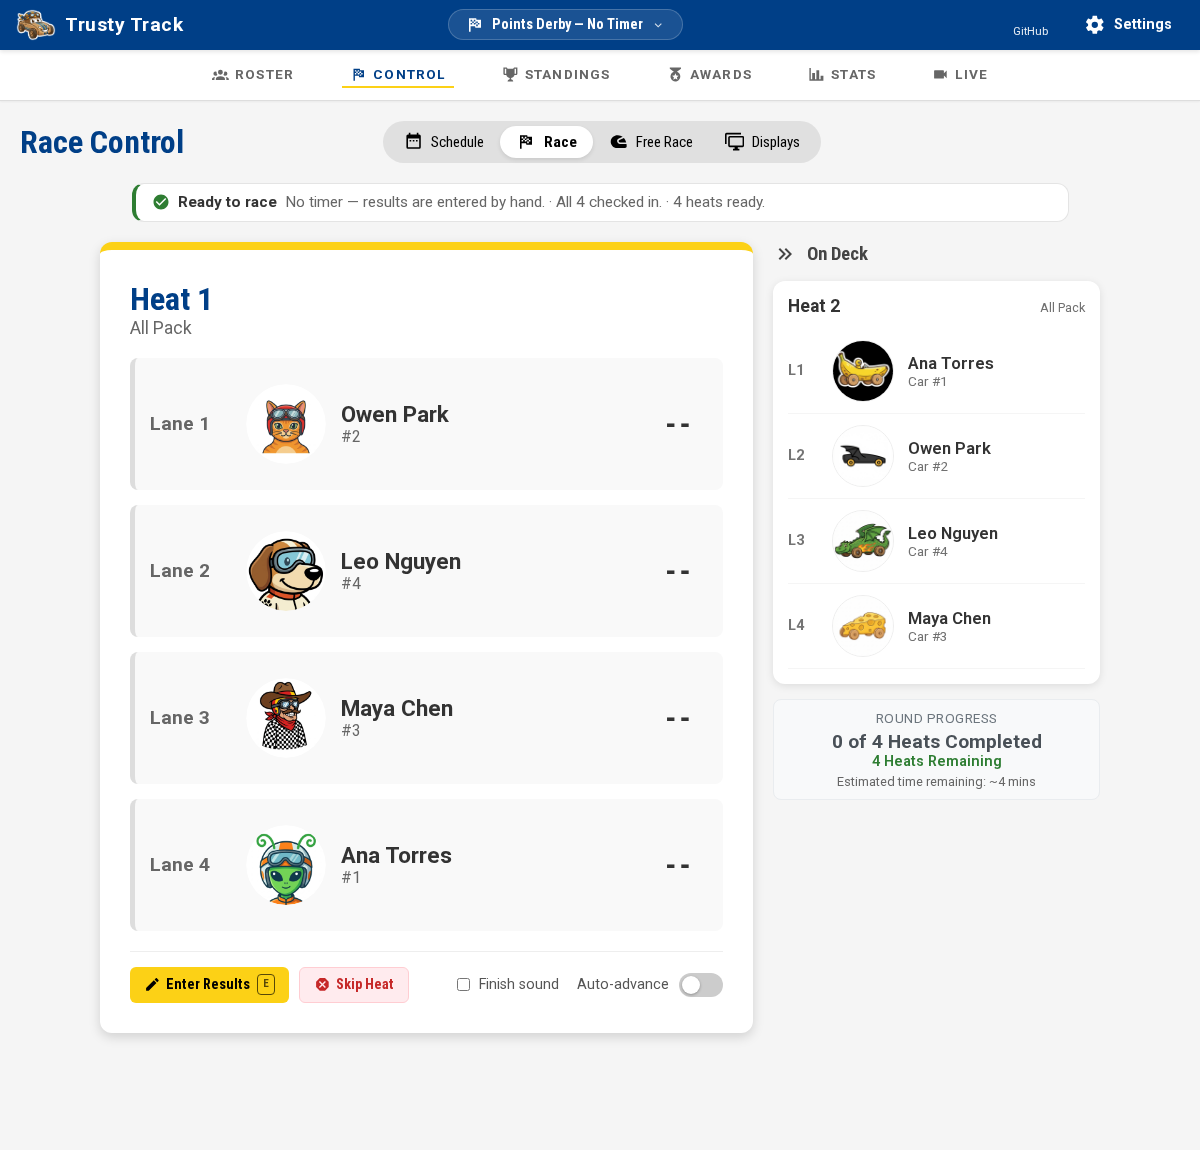 A track configured with no timer: no "Waiting for Timer…" message, and Enter Results stands where Override would on a track that has one.
Recording Results
When a heat finishes:
- Hardware timer: Results appear automatically in the lane cards, showing each racer's finish time and placement.
- Fake timer: Results appear when the run ends — either on its own a few seconds after Start Timer, or as soon as you click Finish Heat.
- Manual override: Click Override (before the heat) or Edit (after) — or Enter Results on a track with no timer — to enter results by hand. A Timed, Cumulative time or Fastest single run race enters times, turned into places automatically on save. A Points race enters finishing order directly in a Place field; a Time field sits alongside it too, for correcting or clearing a time a timer recorded even though points scoring does not use it — the track's record board and stats still read it (see Scoring).
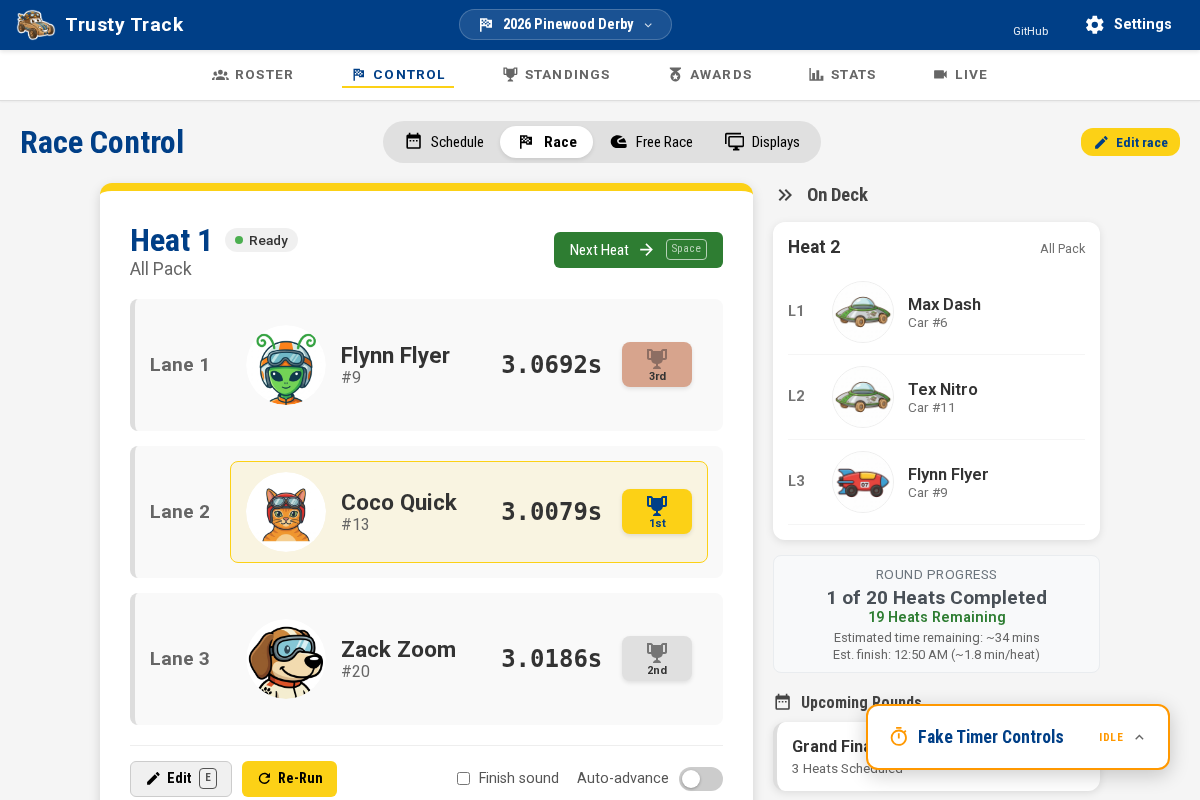 After a heat completes, each lane shows the racer's finish time and placement (1st, 2nd, 3rd, etc.). The 1st-place racer is highlighted in gold.
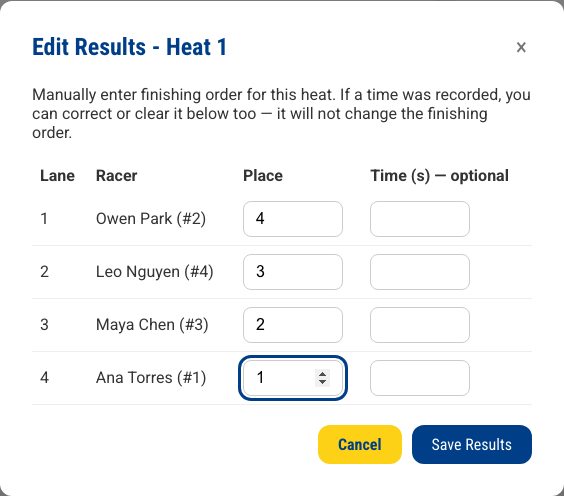 A Points race's entry modal: the Place column is what gets typed in — the finishing order somebody at the line called out — and an optional Time column sits beside it for correcting or clearing a time a timer recorded.
After reviewing results, click Next Heat to advance to the next heat — or enable Auto-advance to move forward automatically after 10 seconds.
Tip
The Auto-advance toggle is in the lower section of the active heat card. When on, the display counts down and advances without any button click.
Keyboard Shortcuts
The race control operator usually has a microphone in one hand. Three keys cover the repetitive parts, and each is printed on the button it mirrors:
| Key | What it does |
|---|---|
| Space | Move on to the next heat, once the current one is recorded. |
| E | Open the result editor — Edit after a heat, Override before one. |
| Esc | Cancel the auto-advance countdown. |
They do nothing while you are typing in a box, while a dialog is open, or when held with Ctrl, Cmd or Alt — so correcting a car name never advances the race, and the browser keeps its own shortcuts. Space deliberately does not start a heat: on a real timer the gate is released by hand.
The Finish Sound
Finish sound, beside the auto-advance toggle, plays a short chime when a heat's results are recorded. Forty feet from the screen nobody knows the result is in until somebody says so, and the chime tells the room without anyone looking at a monitor.
It is off until you switch it on, and the setting is remembered on that device only — your laptop can have it while the wall displays stay silent. Switching it on plays the sound once, which is how you find out whether the machine is muted without waiting for a heat to finish.
Correcting a Result
If a timer result is wrong (for example, a photo-finish dispute or a false start):
- Click Edit on the completed heat card.
- Update the time for each lane as needed.
- Click Save Results.
To completely re-run a heat, click Re-Run — this clears the results and returns the heat to "pending" so it can race again.
Correcting a qualifying time re-decides who advances. A championship round not yet raced re-fills itself; one already raced shows Line-up out of date instead, and the call is yours. Details in Championship rounds.
Skipping a Heat
Skip Heat passes over the current heat without racing it — for when every car in it has scratched, say. The schedule moves on, and the skipped heat can be run later with Run if the cars turn up after all.
Two things to know:
- A skipped heat does not hold anything up. The round still finishes, and a championship round waiting on it still fills.
- If your race is scored on points, the cars in a skipped heat are scored as if they finished last in it. Under Timed, Cumulative time, or Fastest single run, the heat simply is not part of anyone's score. See how skips are scored.
Viewing the Live Leaderboard
The leaderboard updates automatically after every heat. During the race you can check the current standings at any time from the Standings page in the top navigation bar, and the Stats page keeps count of the heats completed so far. The audience can follow standings live on the Observation page (see the Observation Displays Guide).
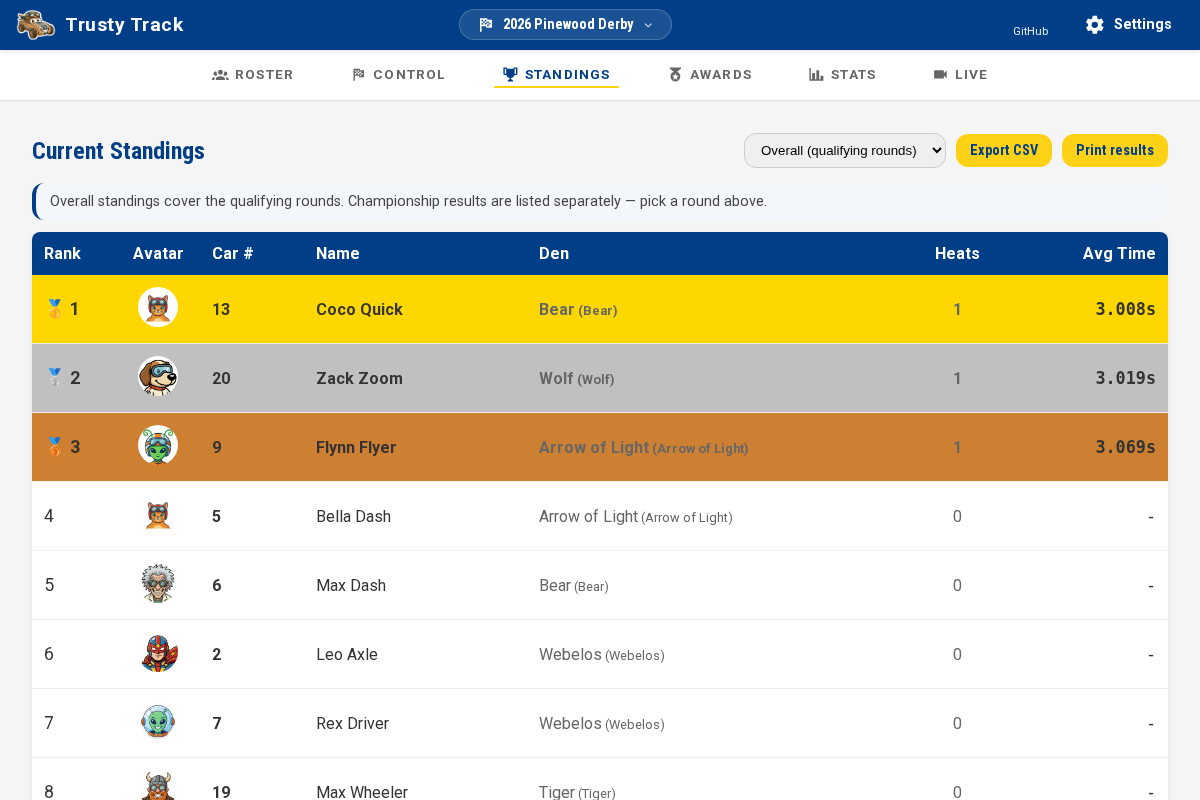 The Stats page part-way through the race, with heats completed and lane fairness updating as results come in.
Taking a Break
Real race nights have real breaks — a snack table, a stuck sprinkler, the gap before the championship round starts. Take a break on the Race tab starts a countdown (5, 10, 15 minutes, or a custom length) that every audience display picks up automatically: whatever a screen was showing switches to a full-screen countdown with the break's name and a faint preview of who races next, until the time runs out or you end it early.
The same presets also appear on the Round Complete! summary, since a round finishing is exactly when a break is most often called.
While a break is running, its bar shows the time remaining and three controls: +5 min to extend it, Pause/Resume to freeze and restart the countdown, and End now to clear it immediately. See Audience display views for what the wall displays show.
Part 4: Championship Rounds (Optional)
When the last qualifying heat is recorded, Trusty Track works out who has made the championship round and shows a summary of them. Click Start Next Round to move on. The summary appears because a championship round was waiting to be filled — if you did not configure one, there is nothing to decide and no summary appears.
The championship round schedule is generated automatically based on who qualified — only the top racers from the qualifying round are included. How the racers are chosen, what happens when a time is corrected afterwards, and what happens if a qualifier leaves early are all in Scoring & Championships.
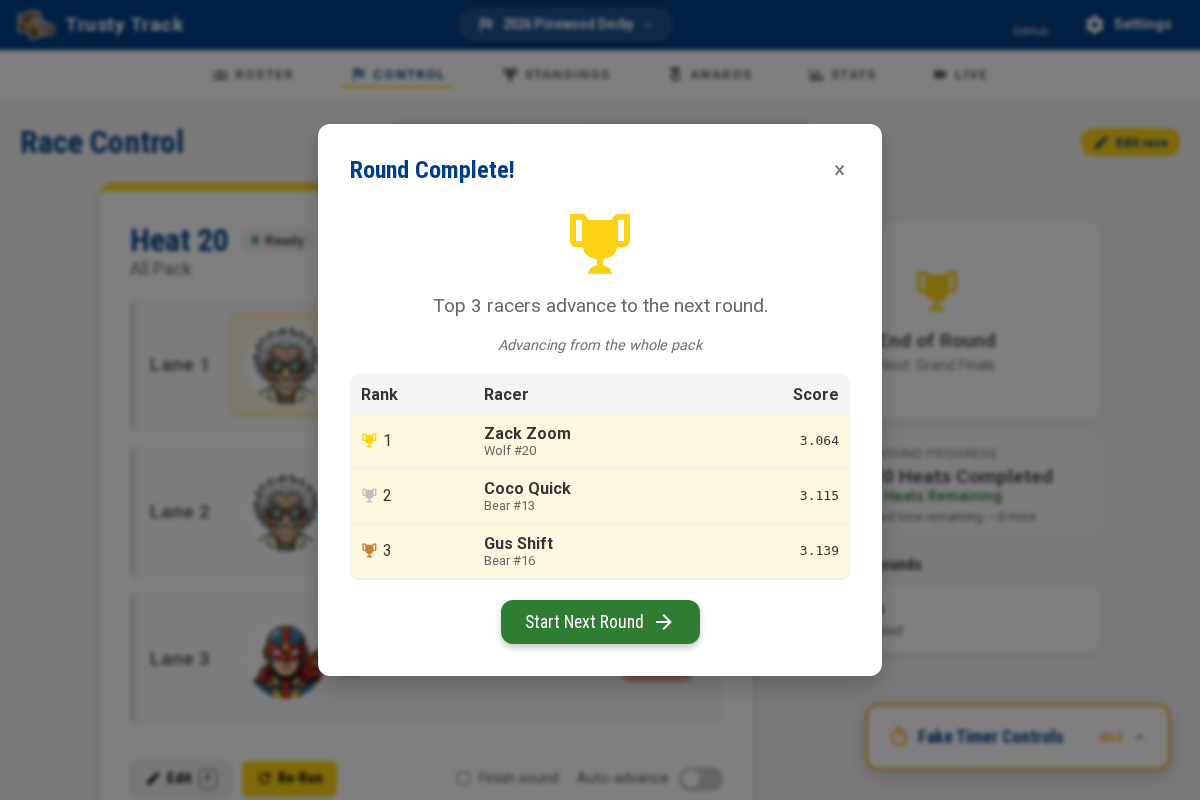 When a championship round's racers are decided, the summary lists who made it, with their scores.
Run the championship heats the same way as the qualifying round. Championship results determine final placement.
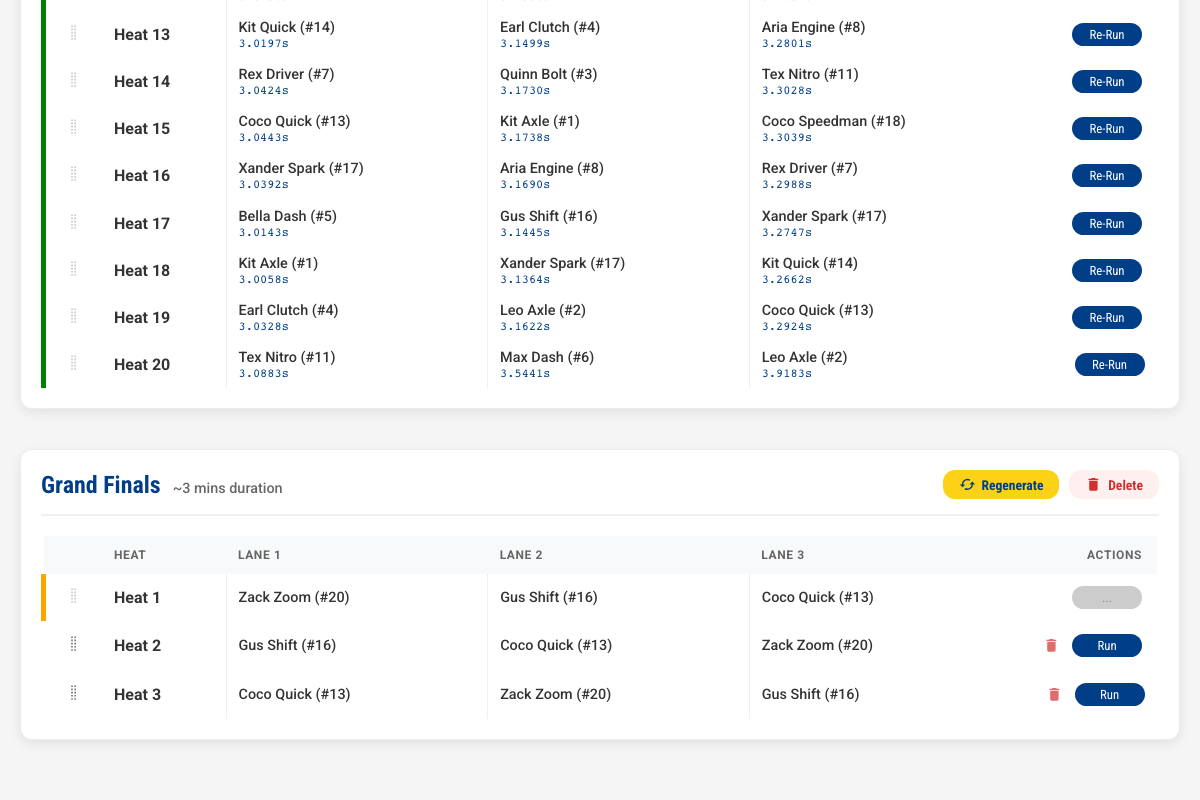 The Schedule tab once the qualifying round is complete — every heat has its times. The championship round, now filled with the qualifiers, sits below it.
Part 5: Final Standings
After all heats are complete, the Standings page shows the final ranked results. Navigate there from the top nav bar.
The Standings page can be put on a large screen or projector so everyone can see the final results.
Print results, at the top of the Standings page, puts the standings and the trophy winners on one page for the noticeboard or the newsletter — see printables.
For the ceremony itself, use the Awards page instead. It holds the trophies you are handing out — the speed ones worked out from these standings, and the judged ones like Best Paint — and Present puts them on a projector one at a time, paced by whoever is holding the microphone.
If the race has a championship round, a selector appears above the table. Use it to switch between Overall (qualifying rounds) and any one championship round. A race with no championship rounds has nothing to switch between, so no selector appears. A Slowest Race round is shown slowest car first — the page says so above the table — because in that round the last one down the track wins.
Note
Overall standings cover the qualifying rounds only — a championship round's cars are picked from those standings, so a final's times never feed back into them. Championship results are shown by selecting that round. The full rules — what counts, what a tie means, why some rounds are left out — are in Scoring.
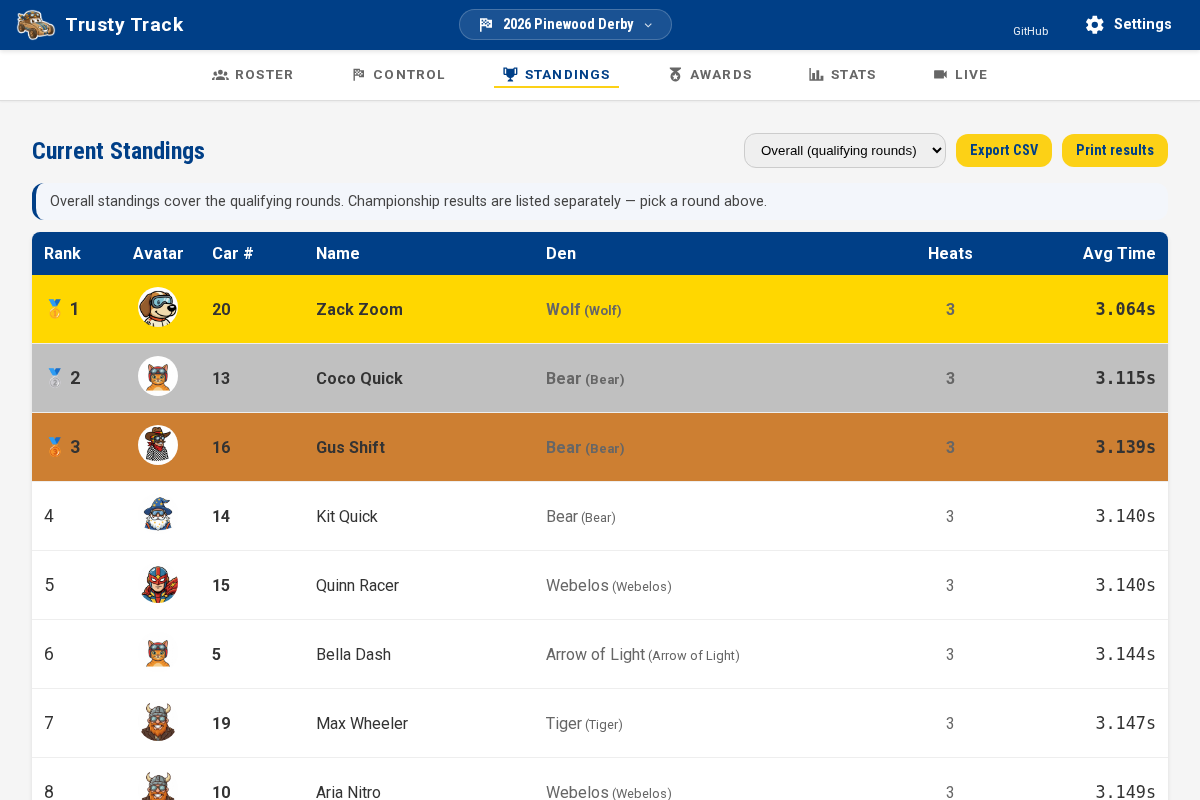 The standings show rank, car number, name, den — with the den's category in parentheses when one is set, like "Wolves (Wolf)" — heats completed, and average time for every racer. The top three rows are shaded gold, silver, and bronze.
Note
A tie shares a rank — 1st, 1st, 3rd. Whether anything more gets decided is the race's Tiebreaker setting: left on the default, settle it yourself with a race-off — a Start run-off button appears against the shared rank — or a corrected time from the result editor; pick one of the other four and Trusty Track settles it wherever the tie actually matters — the last spot in a final, a speed trophy — reporting rather than guessing when the data cannot support an answer. See ties.
Once the results are final, lock the race from Edit race so nothing gets changed by accident on the way out the door — see locking a race.
Common Race Day Scenarios
A racer arrived late
Add them to the roster and check them in as normal. Checking them in is what puts them in the racing — there is nothing else to press.
- A round not yet started is rebuilt with them in it.
- A round part-way through keeps every recorded time; heats are added at the end for the newcomer.
- A finished round is left alone — they start from the next round.
The full rules, including what a points race does about the extra heats, are in Changes in the middle of a race.
Tip
If somebody is checked in and shows No heats on the roster, they arrived after the round they would have been in had already finished. Create the next round and they will be in it.
A racer had to withdraw
Open their check-in entry and turn Passed Inspection / Checked In off. The schedule sorts itself out:
- A round not yet started is rebuilt without them.
- A round part-way through keeps every heat already run; their remaining lanes are emptied.
- A finished round keeps their results.
- A championship spot they held in an unraced round goes to the next qualifier.
If it was a mistake, check them back in — they get their place back. Details in Changes in the middle of a race.
A timer result came in wrong
Click Edit on the completed heat in the Race Execution view to manually correct any time value. If the entire heat needs to be re-run, click Re-Run to clear all results and race it again.
We need to run a practice heat that doesn't count
Use Free Race. A free race heat runs on the timer and appears on the audience display like any other, but it is invisible to standings, schedules, championships and statistics — so it cannot disturb the event.
It is the right tool for a shake-down run before doors open, a parent's or sibling's car, a demonstration for a scout who wants to see the track work, and the fun heats at the end.
From Race Control, switch to the Free Race view and choose who is in each lane. Random fills the lanes from the checked-in roster, which is usually what you want for an impromptu run; Manual lets you pick each lane by hand, and lanes may be left empty; Anonymous names nobody, keeping each time against the lane — for testing the track, or for cars that are not on the roster. Run it exactly as you would an official heat.
See the Free Race guide for the full walkthrough.